Written by: Will Kawalec Lead Play to Learn Facilitator
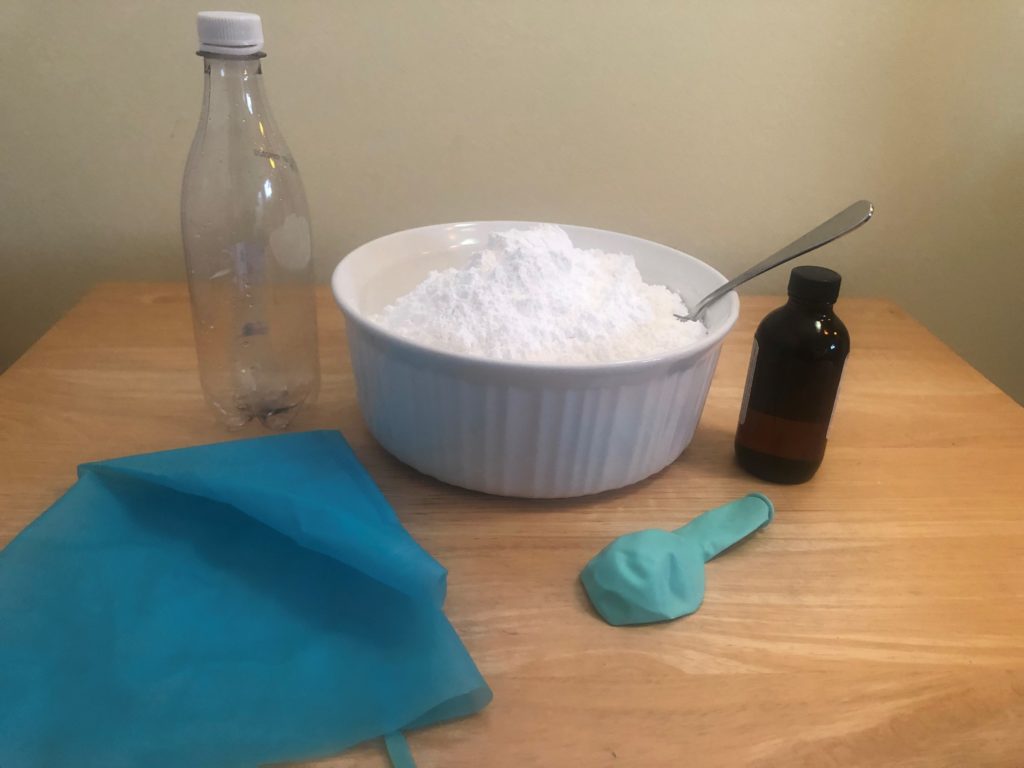
Materials:
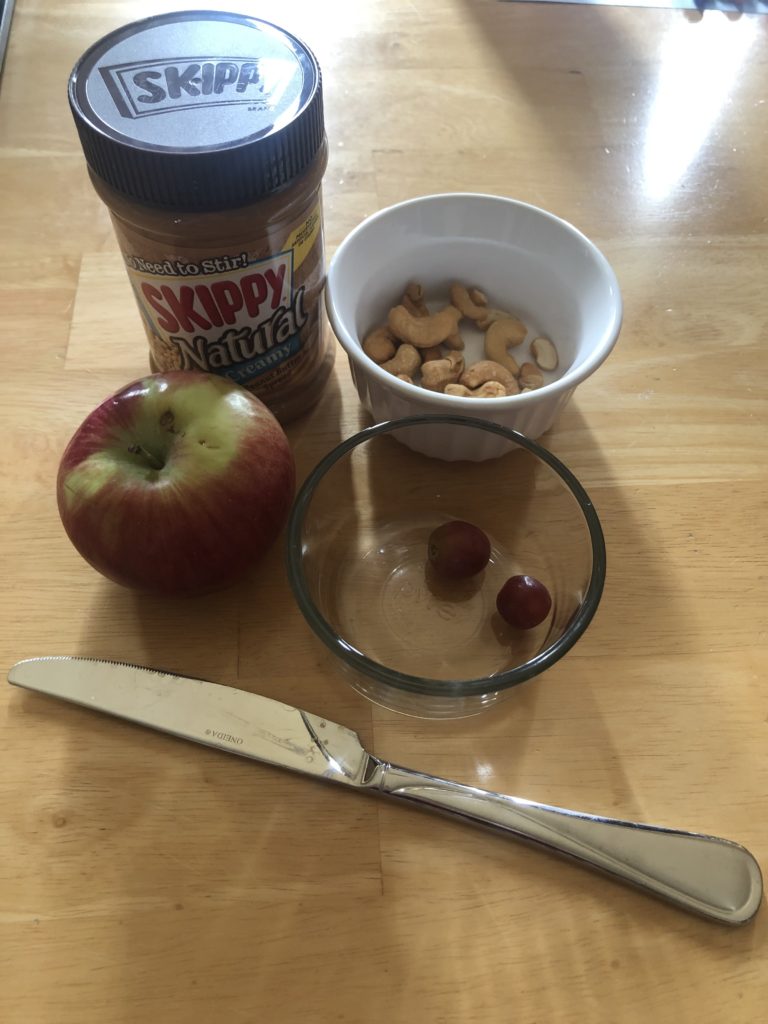
Apple Spreadable nut butter or cream cheese (can use sun butter or nut free as well) Any round fruit (grapes, raisins, blueberry, etc..) Toothpicks Cooking knife Cashews or other small foods
Length:
Set up: 2 Minutes Activity 5-10 Minutes
Academic Subject(s):
Cooking, Art
Sometimes getting your child to eat a healthy treat can be tricky! This simple, tasty treat is simple to make and will get your little one excited about eating healthy! This protein packed, fruit snack is sure to win over even the pickiest eaters.
Directions:
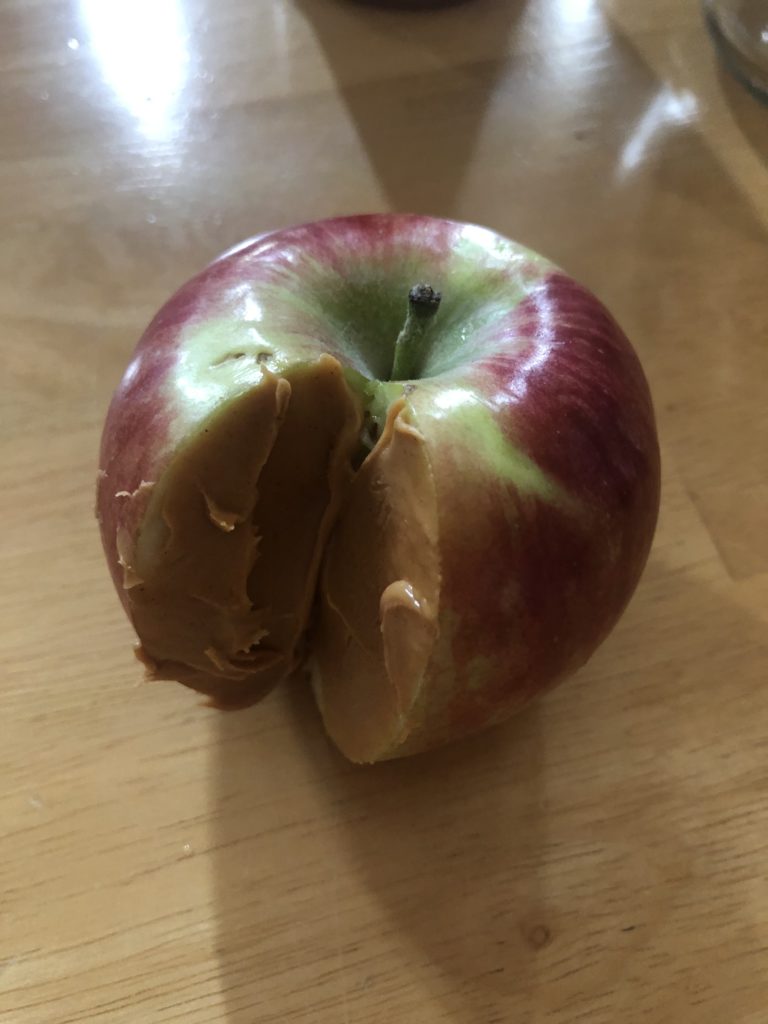
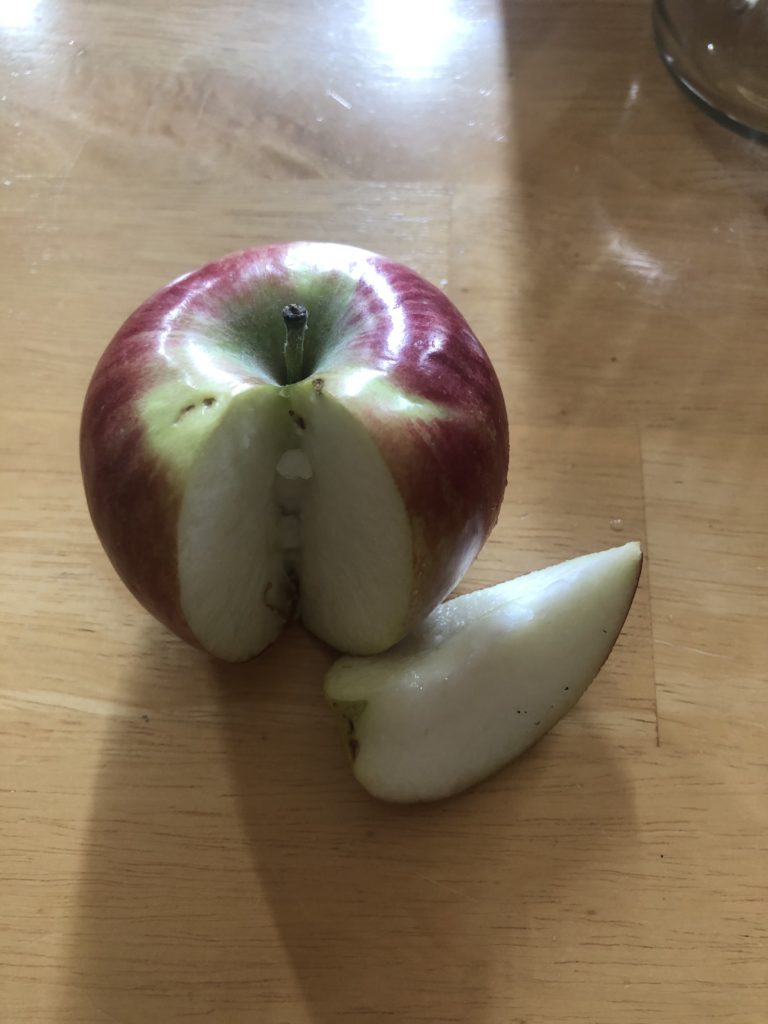
Before beginning have an adult cut out a large slice out of the apple with a sharp kitchen knife.
Step 1: Spread peanut butter in the open mouth of the apple. You can use a butter knife or other kid safe knife here. Another great option is a clean craft stick!
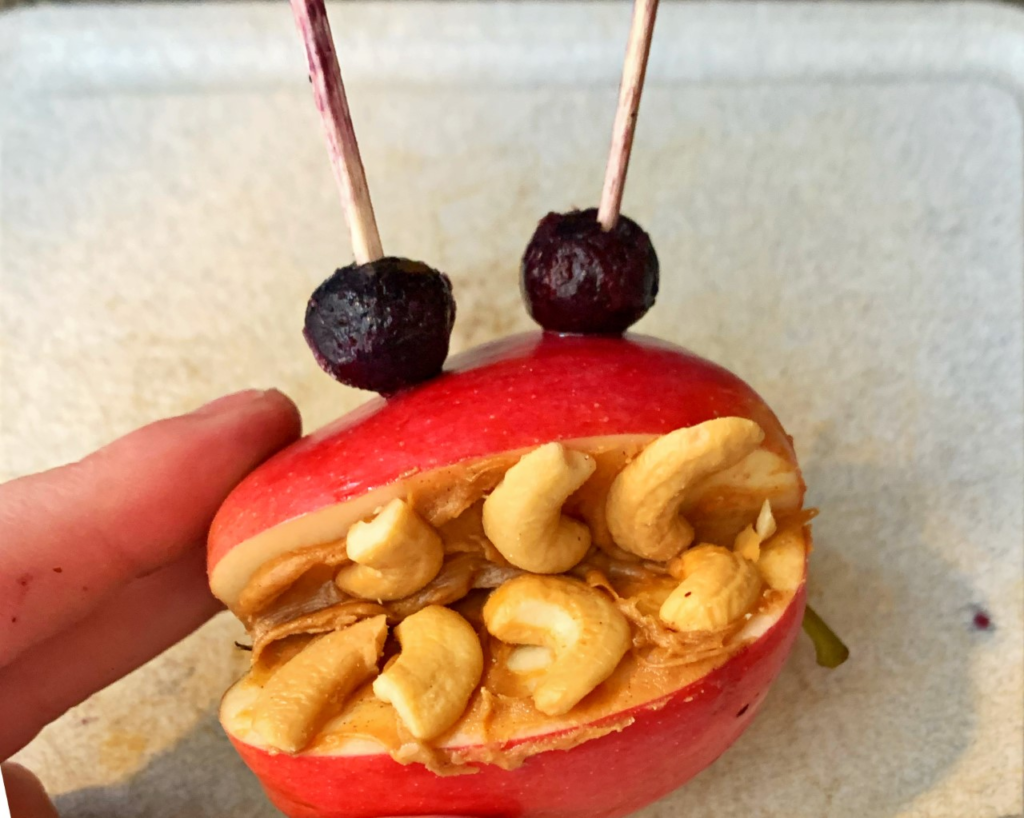
Step 2: Add the teeth to the monster, in this version I used cashews, but really any small food can be used. Other suggestions are raisins or mini marshmallows.
Step 3: Skewer fruit and insert in the top of the apple as eyes for the monster, this can be done with a variety of fruits or vegetables
Sensory Motor, Fine Motor, Gross Motor, Mindfulness/Health & Wellness
Directions:
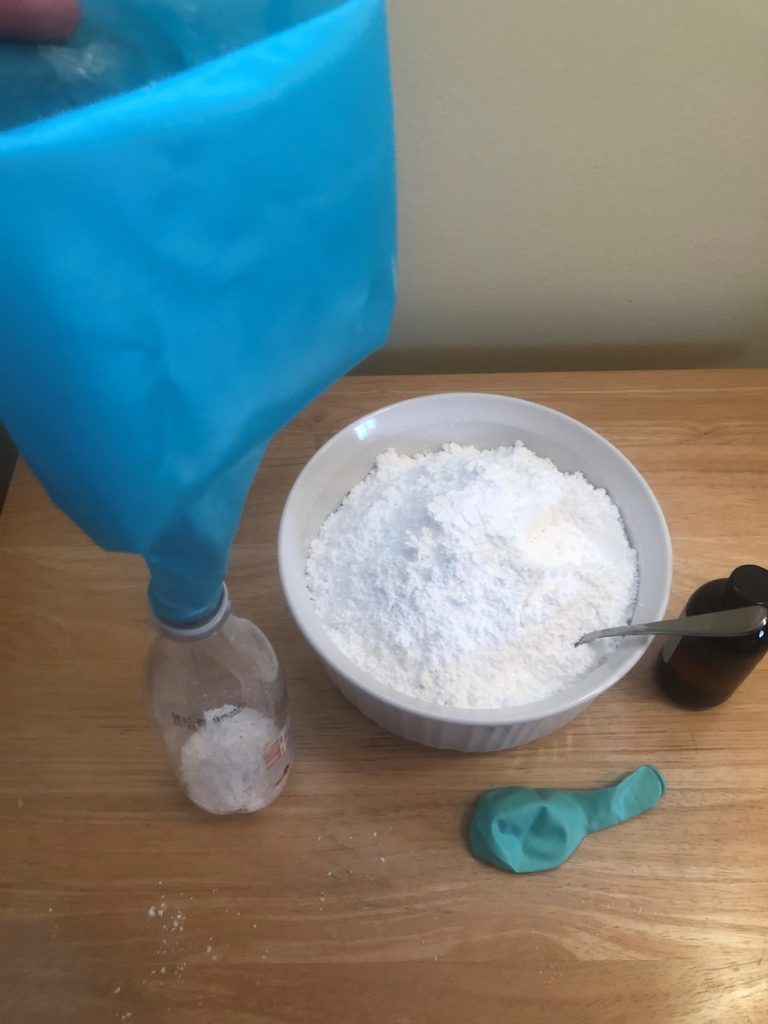
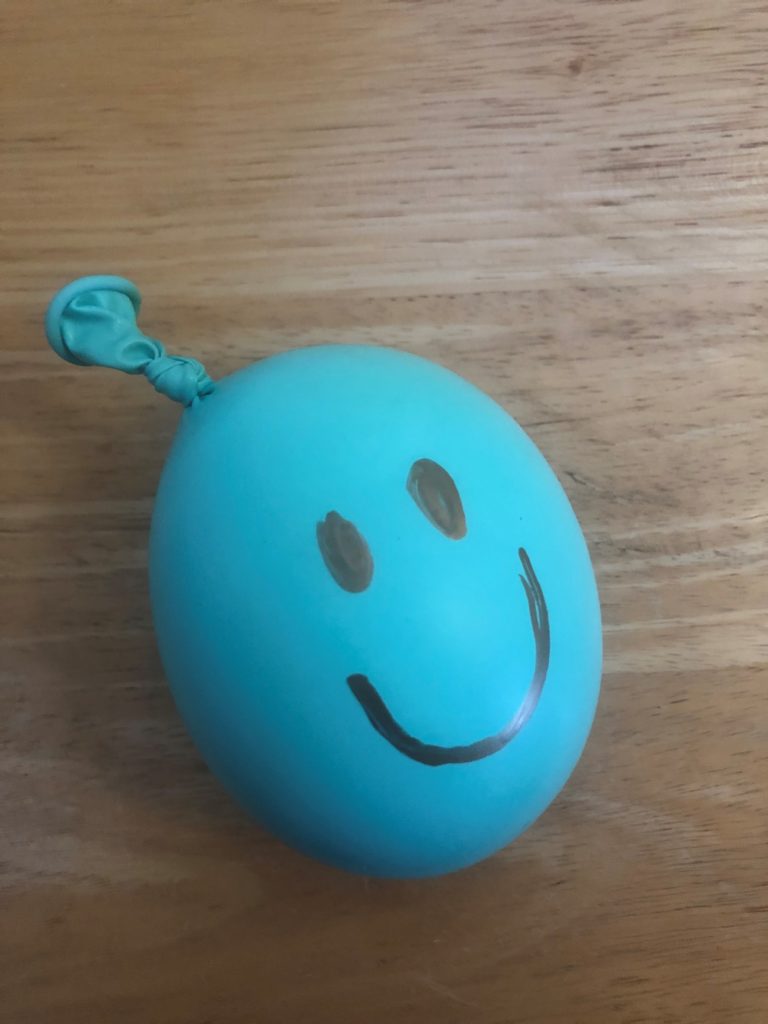
Step 1: Scoop approximately 1 cup of flour into an empty water bottle using a funnel. Don’t have a funnel at home? Try using a pastry bag or even a plastic zip lock bag with the tip cut off! *If you want to add essential oils, do so during this step!*
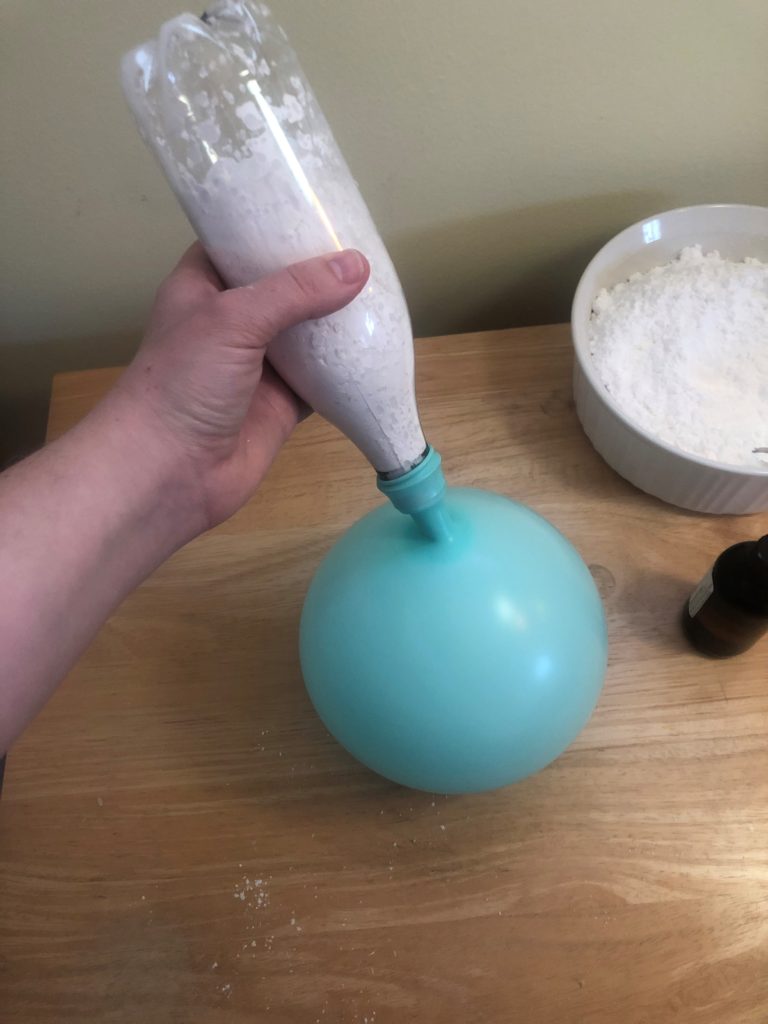
Step 2: Blow up the balloon and secure it to the top of the water bottle. Carefully squeeze the flour into the inflated balloon.
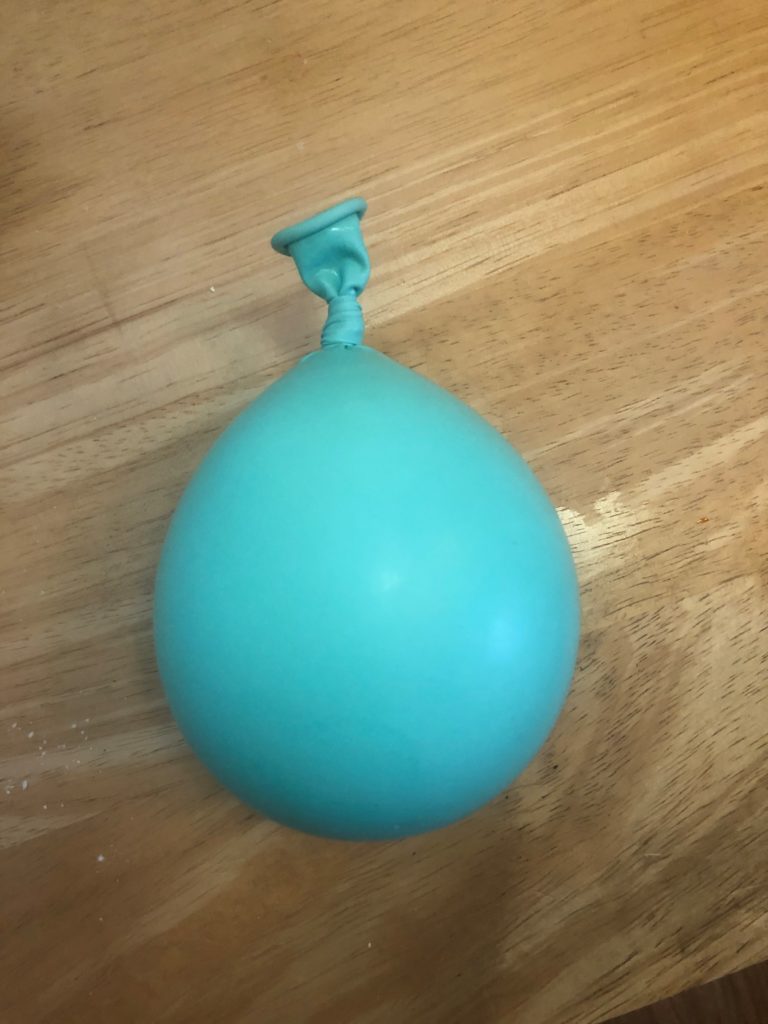
Step 3: Carefully remove the balloon from the top of the water bottle and tie it closed.
Step 4 (optional): Use a permanent marker to draw a smiley face or other design on the balloon!
Let’s face it we all need to relive a little bit of stress right now – even the kiddos! When our bodies feel stress we tend to clench our muscles. By using a stress ball the repetitive squeeze and release motion leaves the user feeling less stressed! And if feeling less stressed isn’t enough these simple toys can also help your child concentrate better on certain tasks. In a study published in the Journal of At-Risk Issues, students that used stress balls in class were less distracted than those who didn’t.
Vocabulary Words
· Inflate: to fill with air or another gas · Clench: to close into a tight ball, especially when angry or stressed
Outdoor space Chalk and/or outdoor items such as toys, sports equipment, rope, etc.
Length:
Set up: 5-10 minutes Active: 10-30 minutes
Academic Subject(s):
This lesson supports your student’s curriculum: Physical Education Standard 1 – Health and Fitness
Directions:
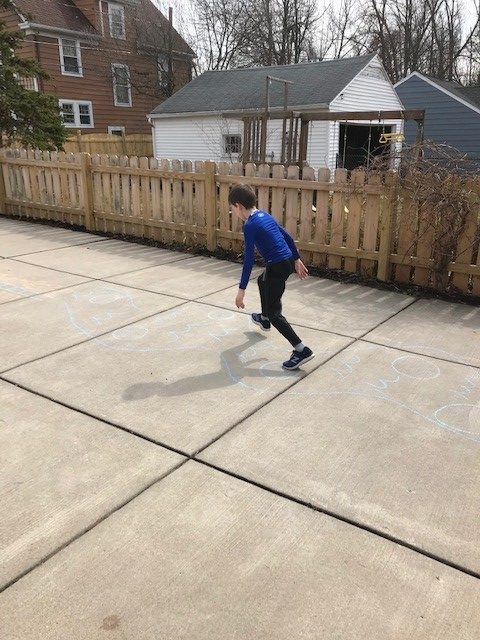
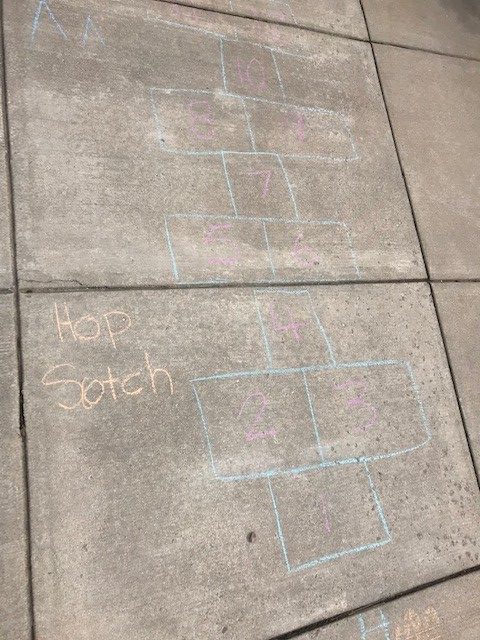
Step 1: Discuss or draw up plans for the type of physical challenges your child would like try. Examples include running, leaping skipping, jumping, jumping jacks, jumping rope, rolling, hop scotch, balancing, dribbling, passing a ball, squats, kicks, crawling, etc.
Step 2: Decide where you would like to play; on grass or on pavement. A grass obstacle course is ideal for activities like rolling or crawling that require a softer surface, while a chalk obstacle course is ideal for pavement.
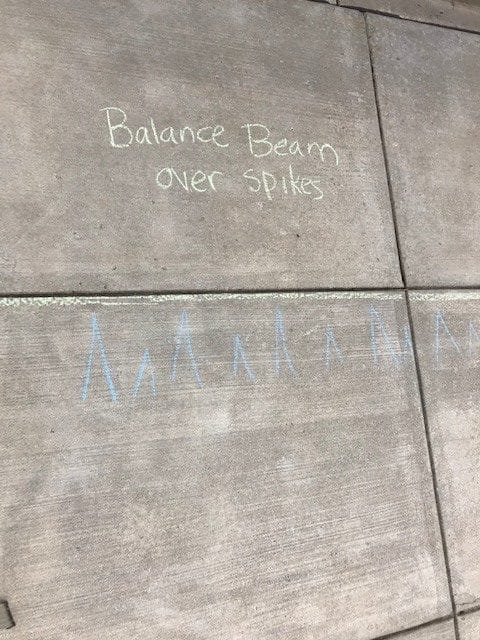
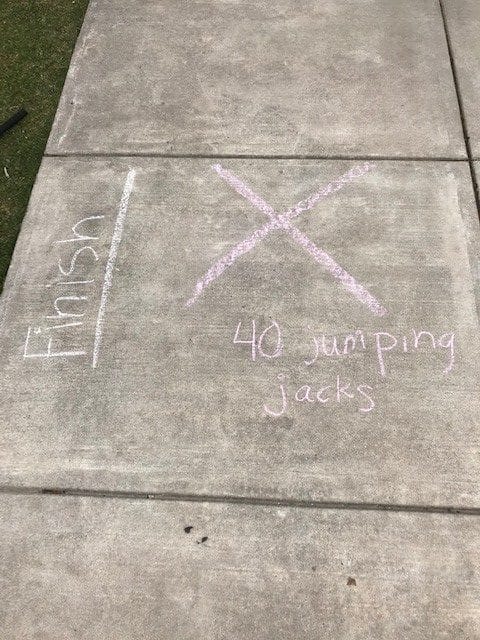
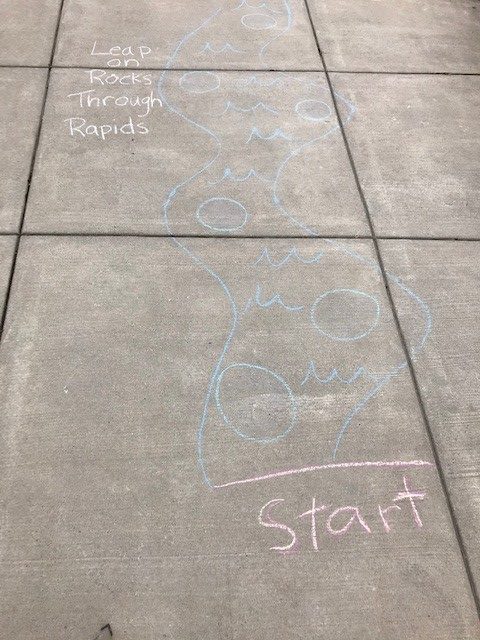
Chalk Obstacle Course: Step 1: Using chalk, draw up an obstacle course that includes the physical challenges you’ve chosen. Be sure to mark the start and finish and discuss the order of the obstacles.
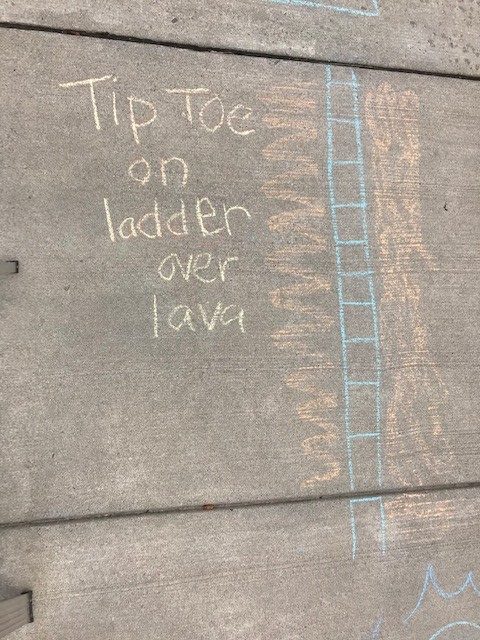
Step 2: Make up a story to go with the obstacle course. For example, pretend you are an explorer looking for a secret cave. You have to jump from rock to rock without falling in the rapids. Then you have to tip toe over the ladder that hangs above molten lava. Next, you must complete the hop scotch without stepping on the trap door that leads to a pit of snakes. Then you must walk a tight rope over the spikes. Finally, you must do 40 jumping jacks to reveal the opening of the cave!
Step 3: Complete the course!
Grass Obstacle Course Step 1: Place outdoor items in the yard. Be sure to include the physical challenges you’ve chosen.
Step 2: Mark the start and finish and decide the order of obstacles.
Step 3: Complete the course! Tip: Parents, make sure you join in on the fun! Obstacle courses are great exercise!
Variations:
• Using a watch or stop watch, time how long it takes to complete the course one or more times. Try to improve each time! • Pretend you are the announcer, like in a sporting event! Narrate and provide positive comments as the other person completes each section of the course.
Sidewalk Chalk Outdoor Play Space At least 2 players (it can be any number of children/adults above two as well)
Length:
Set up: 10 minutes Play Length: Endless!
Academic Subject:
Physical Education This lesson supports areas of Early Childhood Development and K – 8 Curriculum: Fine and Gross Motor Skills
Directions:
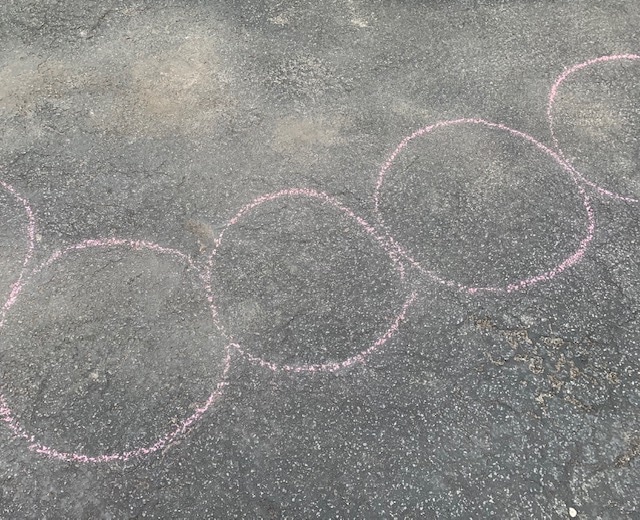
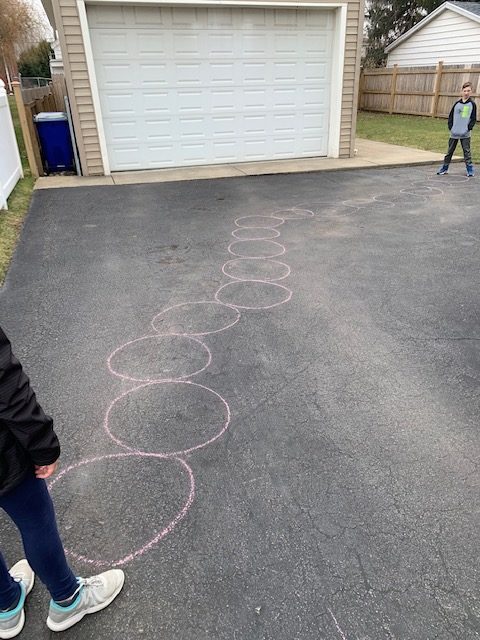
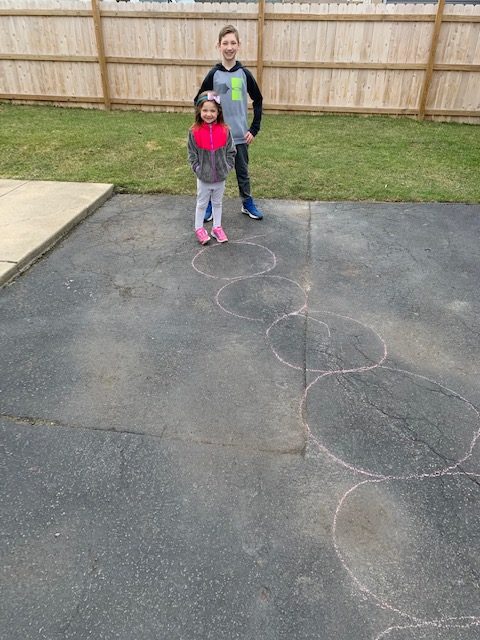
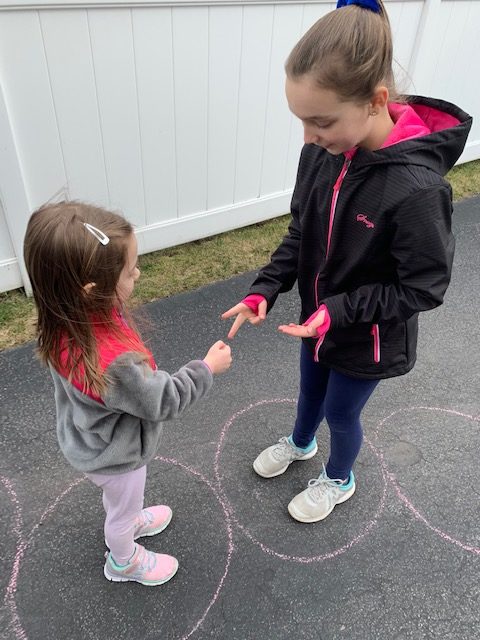
Step 1: Draw large connecting circles with sidewalk chalk on an appropriate outdoor surface (example: your driveway) in a pattern that resembles a wiggly caterpillar. Did you know that drawing circles is a wonderful way for kids to practice their fine motor skills? If there are only 2 players, draw between 14 – 20 circles. For teams of 2 or more draw about 30 circles total. Remember to make an even number of total circles so it’s fair hopping towards the middle. Some kids hop faster than others!
Step 2: Review the rules of the Rock, Paper, Scissors game with all of the players.
Step 3: Have 1 player (or each team) start from opposite ends of the circle game board. Get ready to start hopping!
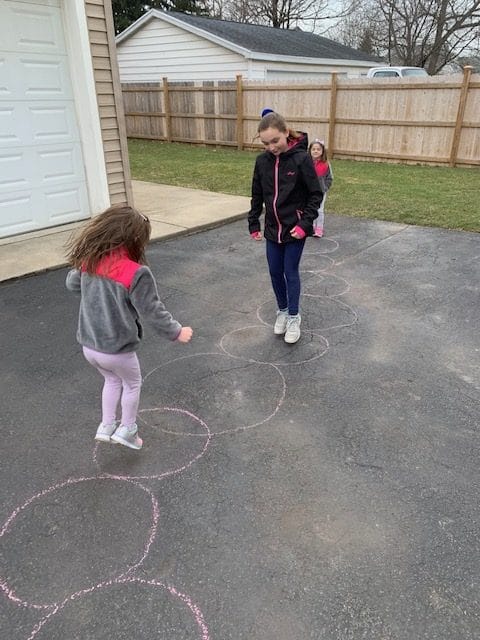
Step 4: On “Go!” 1 player/or the first player from each team hops from circle to circle until they reach their opponent anywhere on the circle game board (it won’t necessarily be in the middle). Did you know that hopping and jumping require strong gross motor skills,balance and coordination?
Step 5: Players do rounds of Rock, Paper, Scissors until one player wins one round. The winning player of that round continues to hop forward to the opponents’ side; the player that didn’t win that round runs back to their starting side to tag their next teammate or to start from the beginning again (if they are the only player). The player that didn’t win the round would then begin hopping toward their opponent again for the next round of Rock, Paper, Scissors (unless the winning opponent reaches the other side first…then that game of Hoop Hop is over). The player/team that reaches their opponents’ side wins that game of Hoop Hop! Kids will be having so much fun playing the game, they won’t even realize the gross motor skills that they are practicing and the wonderful exercise they are getting too! Enjoy this game on a fun sunny day!
Vocabulary Words
· Gross Motor Skill – Skills that are involved in movement and coordination of the arms, legs, and other large body parts and movements. · Fine Motor Skill – Skills that require greatercontrol of the smallmuscles than largeones, especially forhand-eye coordination or for precise handand finger movement. · Even number – A whole number that is able to be divided by two into two equal whole numbers. The numbers 0, 2, 4, 6, and 8 are even numbers for example. · Balance – An even distribution of weight enabling someone or something to remain upright and steady. · Coordination – The ability to use different parts of the body together smoothly and efficiently.
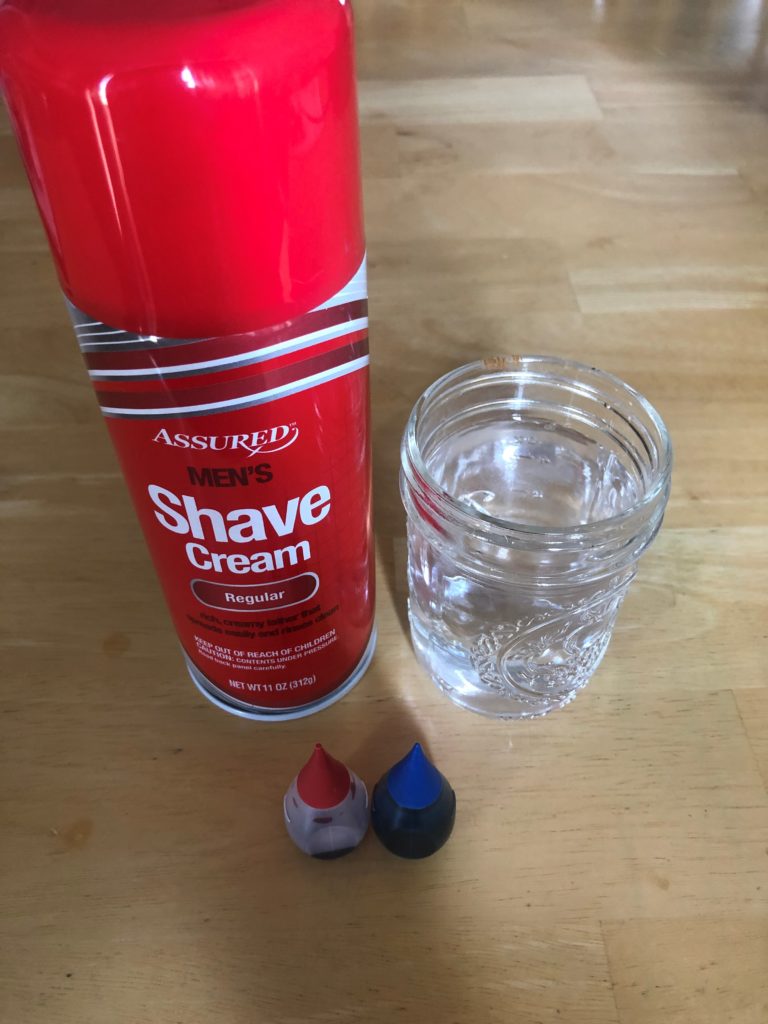
Clear Glass or Vase Shaving Cream Food Coloring Small Cup
Length:
Set up: 5 Minutes Activity 5-20 Minutes
Academic Subject(s):
Art, Science This lesson supports the following curriculum standards: VA:Cr1.2.PK-2, P-ESS2-1, K-ESS2-1, K-ESS3-2, K-PS3-1, 3-ESS2-3
They say: “April showers bring May flowers” but what does that really mean? Well, the old saying is trying to explain that sometimes unpleasant things (like a month of heavy rains) brings something good in the end (flowers blooming in May). What we are going to look at in this activity is the process of those “April Showers” or heavy rains by making a raining rainbow!
In this activity the child will not only get to use their imagination and create a colorful cloud, but also create a 3-dimensional cloud that displays two steps of the water cycle – condensation (water collecting in the clouds) and precipitation (rain)!
Directions:
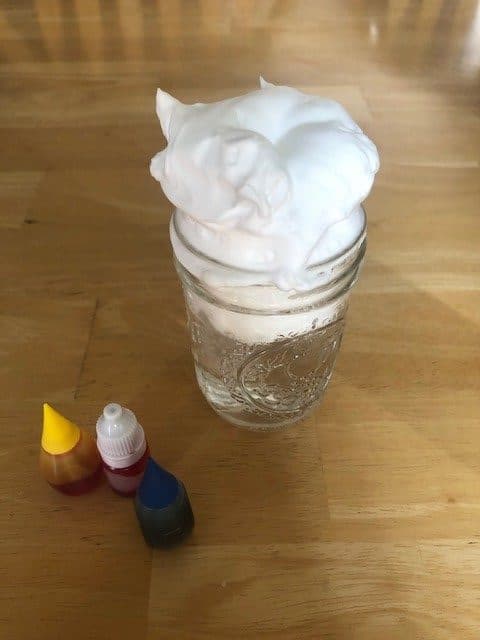
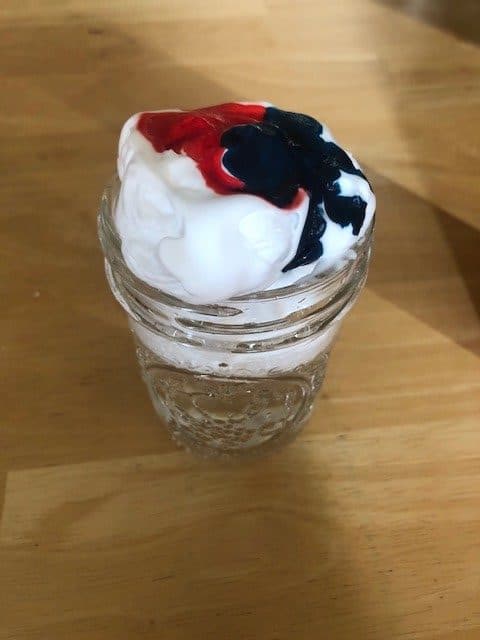
Step 1: Fill a large clear glass with water, this should be filled 4/5 of the way. For this experiment, the water represents our atmosphere – the air all around us that we breathe. Step 2: Spray substantial amount of shaving cream on top of the water, this is your cloud. Step 3: Carefully drop food coloring onto the top of the shaving cream cloud. Make observations as the colors should run through the cloud and into the glass. This is a great opportunity to teach younger kids about color mixing buy using only primary colors and observing how they mix together to make secondary colors!
Tip: If you have an eyedropper at home, we recommend diluting the food coloring with water first then slowing adding it to your cloud using an eyedropper. Just like real clouds, this experiment won’t rain until the shaving cream cloud is filled with enough liquid. If you do not have an eyedropper the experiment will still work you will just need more food coloring.
What is happening here? The science explained: Just like with a real cloud, when the shaving cream becomes too full of water it begins to rain back down into the atmosphere. The collection of the water in the clouds is called condensation. The condensation falling into the atmosphere is also known as precipitation. Precipitation in this experiment is rain however, it can also come in the form of snow, ice, sleet or hail. Precipitation and condensation are just two of the steps in the water cycle.
Vocabulary Words
· Condensation– When water converts from a gas to a liquid. In the water cycle this is after water has evaporated in the air and begins to collect in the clouds. · Meteorology– The branch of science that studies the weather. A meteorologist predicts what weather will happen. · Precipitation– The condensation falling into the atmosphere. Precipitation in this experiment is rain however, it can also come in the form of snow, ice, sleet or hail. · Atmosphere – The gasses that surround the earth or another planet. For earth this is the air we breathe every day! · Water Cycle – This is the process of water circulating between the earth and the atmosphere. There are four basic steps in the water cycle. 1. Collection: examples of collection are oceans, rivers, lakes, streams etc. This is the part of the water cycle with water remains on the earths surface. 2. Evaporation: when water is heated up by the sun and turns into a gas 3. Condensation: When water converts from a gas to a liquid. In the water cycle this is after water has evaporated in the air and begins to collect in the clouds. 4. Precipitation: The condensation falling into the atmosphere. Precipitation in this experiment is rain however, it can also come in the form of snow, ice, sleet or hail. · Primary Colors: These colors cannot be created by mixing together other colors. The primary colors are red, yellow and blue. · Secondary Colors: These colors are created by mixing together two primary colors. The secondary colors are orange, green and purple. Orange is created by mixing red and yellow. Green is created by mixing blue and yellow. Purple is created by mixing blue and red.