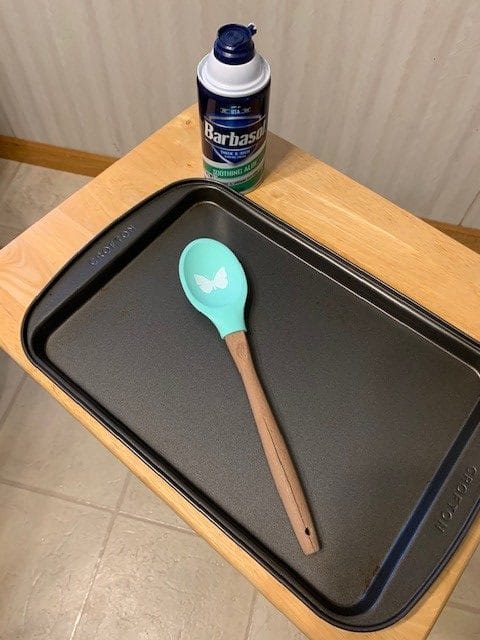
1 clean baking pan Shaving cream Spatula (optional) Sight Words or spelling words to practice
Length:
Set up: 1 minute Activity: 15-20 minutes per child
Academic Subject:
English Language Arts (ELA) This lesson supports areas of Early Childhood Development and PreK Curriculum: · PreK Standards: Learning sight words to develop reading skills. It additionally supports writing practice.
Practicing sight words and spelling words doesn’t have to be a routine task just to check off your homeschooling to-do list. Here’s a fun and creative way to make it fresh and fun!
Directions:
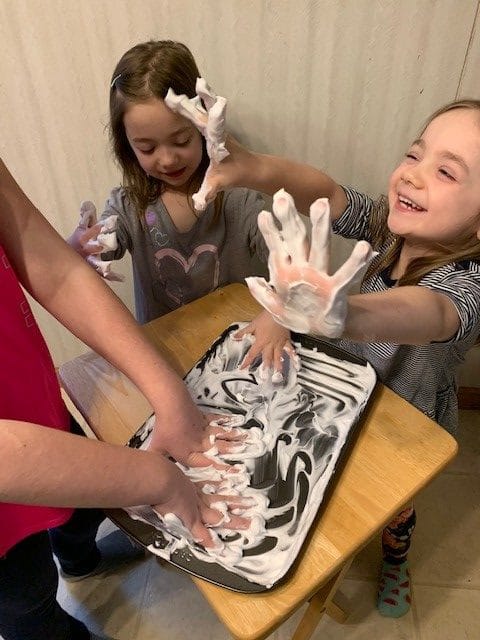
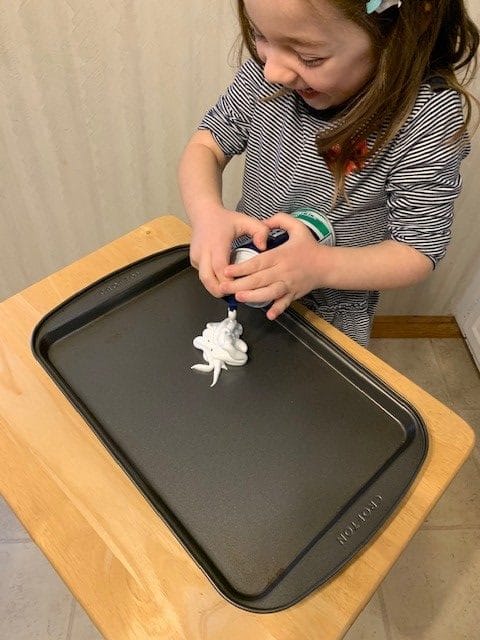
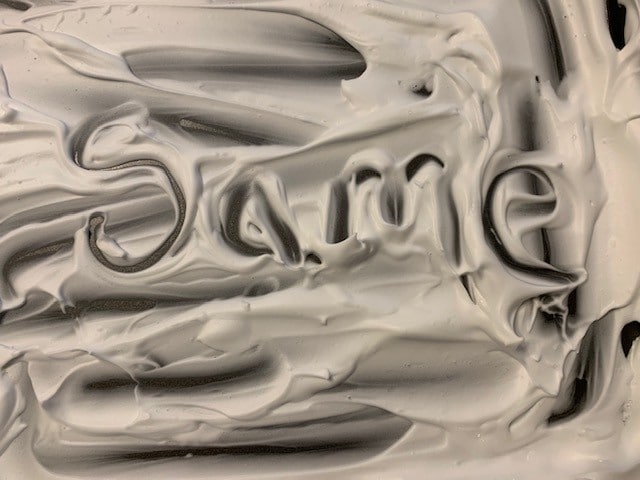
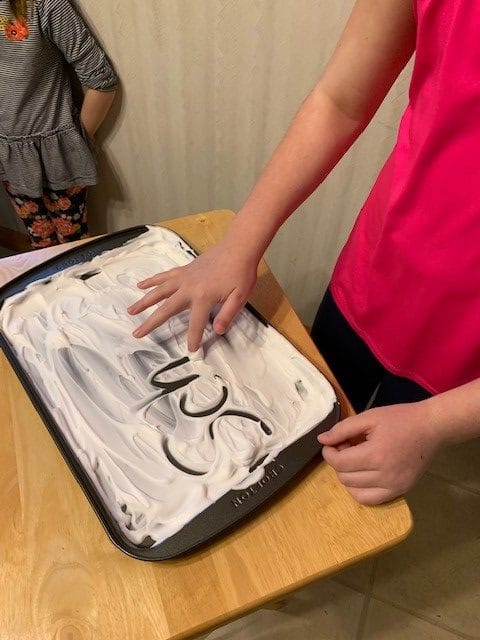
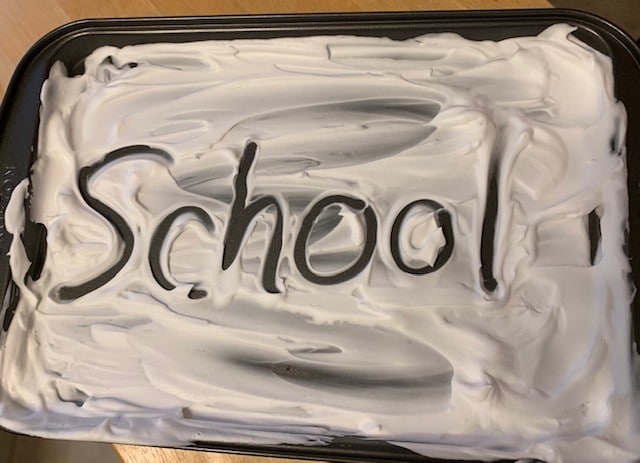
Step 1: Spray a generous amount of shaving cream onto the baking pan. Pressing the dispenser on the shaving cream can is a great way to practice a fine motor skill! Have your child roll up their sleeves.
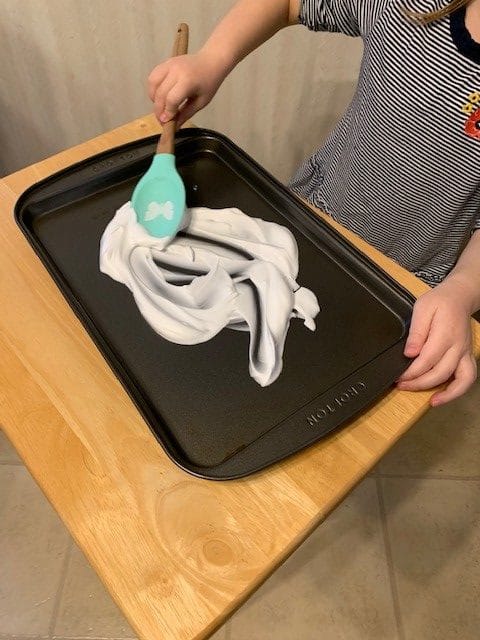
Step 2: Let your child use a spatula to spread the shaving cream into a thinner layer on the baking pan, or even better, let them spread it out with their hands! Getting messy is part of the fun!!!
Step 3: Have a list or key ring of sight words or spellings words for them to practice. Give them one word at a time to write in the shaving cream. It’s ok if they get it wrong, they can just swipe the shaving cream back and forth to erase and try again! Touching a substance like shaving cream is also a cool sensory experience for kids. Let them squish it between their fingers at the end of the activity to experience how it feels!
After working on the sight words, encourage your PreK/K student to practice drawing things like shapes, numbers and letters for fun too! Older kids (Grades 1-5) can work on addition/subtraction/multiplication/division problems and sentence writing in the shaving cream!
Vocabulary Words
· Fine motor skill – Skills that require greater control of the small muscles than large ones, especially for hand-eye coordination or for precise hand and finger movement. · Spatula – An implement with a broad, flat, blunt blade, used for mixing and spreading things, especially in cooking and painting. · Sensory – Conveying nerve impulses from the sense organs to the nerve centers.
Written by: Julia McMahon Lead Play to Learn Facilitator
Materials
Paper: 2 pieces the same size, the thicker the better Glue stick Paper strips: different colors, about 1/2″ – 3/4″ wide, or a bunch of stickers Pencil Scissors
Length:
Set up: 5-15 minutes Active: 10-30 minutes
Academic Subject(s):
Arts, Math This lesson supports your student’s curriculum: PreK.ARTS.16 K.ARTS.17 1.ARTS.17 MST PK.G.A MST K.G.A, K.G.B MST 1.G.A.2 MST 2.G.A.1
Directions:
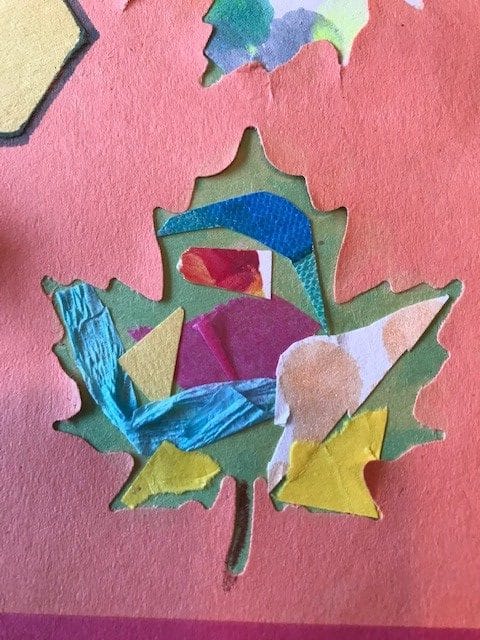
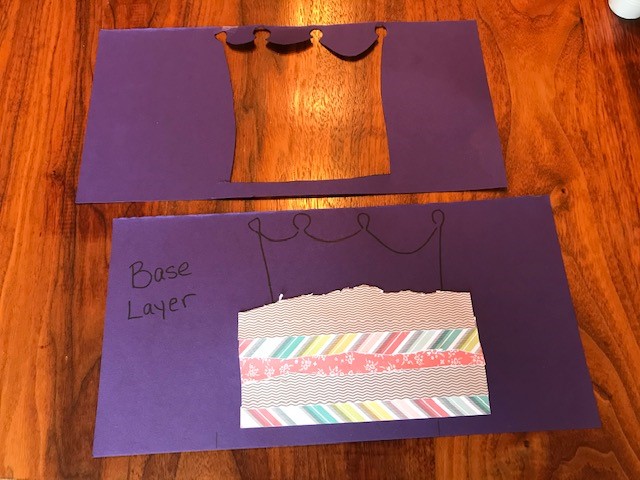
Step 1: Collect or cut out two pieces of paper the same size. The thicker the paper the better. I like card stock, but construction paper, printer paper, or even a paper bag will work! One piece will be the base layer, the other will be the silhouette layer.
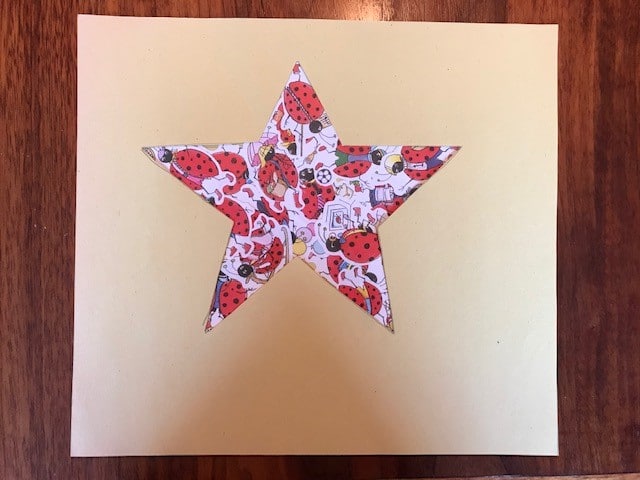
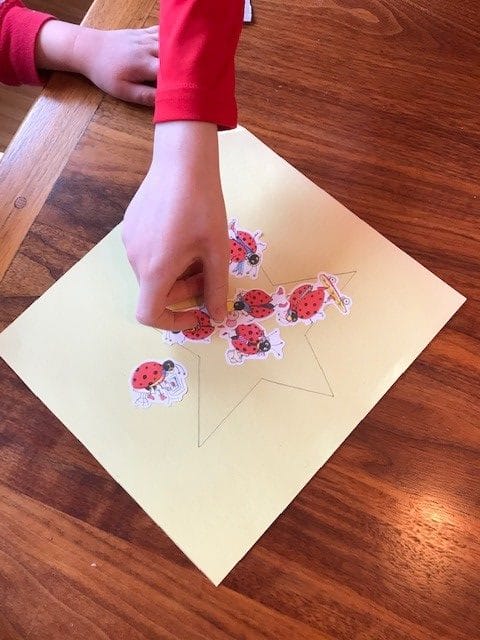
Step 2: Draw a silhouette of a picture on one piece of paper. The simpler the better! Examples include a star, heart, flower, tree, bunny, duck, cloud, etc.
Step 3: Parents, cut out the silhouette.
Step 4: Trace the silhouette onto the second sheet of paper, the base layer, as pictured.
Step 5: Cut strips of colored paper, about 1/2″ – 3/4″ wide. Cut as long as the widest part of your silhouette.
Step 6: Once your paper strips are cut, decide how you want to lay out the strips on the page. I chose the following pattern: rainbow stripe, brown chevron, pink flowers, repeat. Patterns are an important concept in both math and science.
Step 7: Glue a strip of paper horizontally, starting at the bottom of the traced picture on the base layer of paper. Glue the next piece of paper above and parallel to the first, as shown. Leave as little space as possible between paper strips. It may be necessary to overlap the strips a bit, depending on how straight they are.
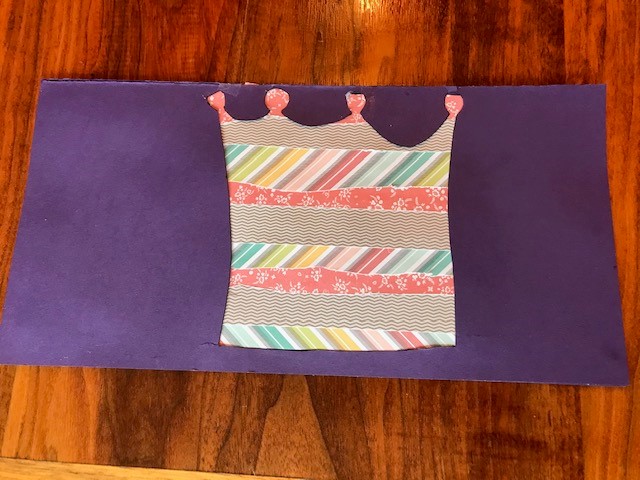
Step 8: Glue the entire back of the silhouette paper. Be sure to glue well along all inside and outside edges.
Step 9: Place the silhouette layer (glue side down) on top of the base layer with the color strips, as pictured.
Variations:
• Use the front of an old card as the base layer and make an outdated card new again! • Use stickers instead of paper strips on the base layer. • Use ripped pieces of scrap paper (like construction paper or old pictures) instead of paper strips, on the base layer.
Vocabulary Words
• Silhouette: the outline of someone or something • Parallel: side by side lines that are the same distance apart and never cross each other • Pattern: when numbers, colors, shape or sound are repeated over and over again. • Horizontal line: line that runs left to right (not up and down)
English, Writing, Literacy, Music This lesson supports your child’s NYS curriculum: ELA 3rd – 5th Grade
We have been presenting several activities to assist with literacy and vocabulary development for our friends under 8 years old. This activity, inspired by the famous play King Lear by William Shakespeare, is perfect for your upper elementary students to get creative and have fun will building up their literacy skills! Use the steps below and follow the attached guide to create your own play right in your living room!
Directions:
Step 1: Print out or copy down the template attached below (note: this can be used for multiple scenes or simply just once). This will direct your child to create a scene of a play or musical that can be acted out at home. Step 2: Have the child fill out the sheet emphasizing imagination and creativity. Step 3: Quickly read over the play and have the child dress up and/or prepare are stage. This can be as simple as putting a sheet up or even taking a reading lamp and shining it on the performer. Step 4: When ready sit and watch or act in the original performance!
Vocabulary Words
· Playwright: A person who writes plays or musicals, such as William Shakespeare, Lin-Manuel Miranda, or Arthur Miller. · Composer: A person who writes music, this can be for plays, musicals, movies, television. · Stagehand: A person who assists behind the scenes of a stage performance, assisting with scenery, lighting, visuals, and sound. · Setting: The location or place where a story takes place. The setting is where everything happens! · Plot: What happens in a story or a scene! The plot is what is happening. · Dialogue: The words said by characters in a story.
Fun Fact: William Shakespeare wrote the famous play King Lear while in quarantine. Maybe this play can be the next great one!
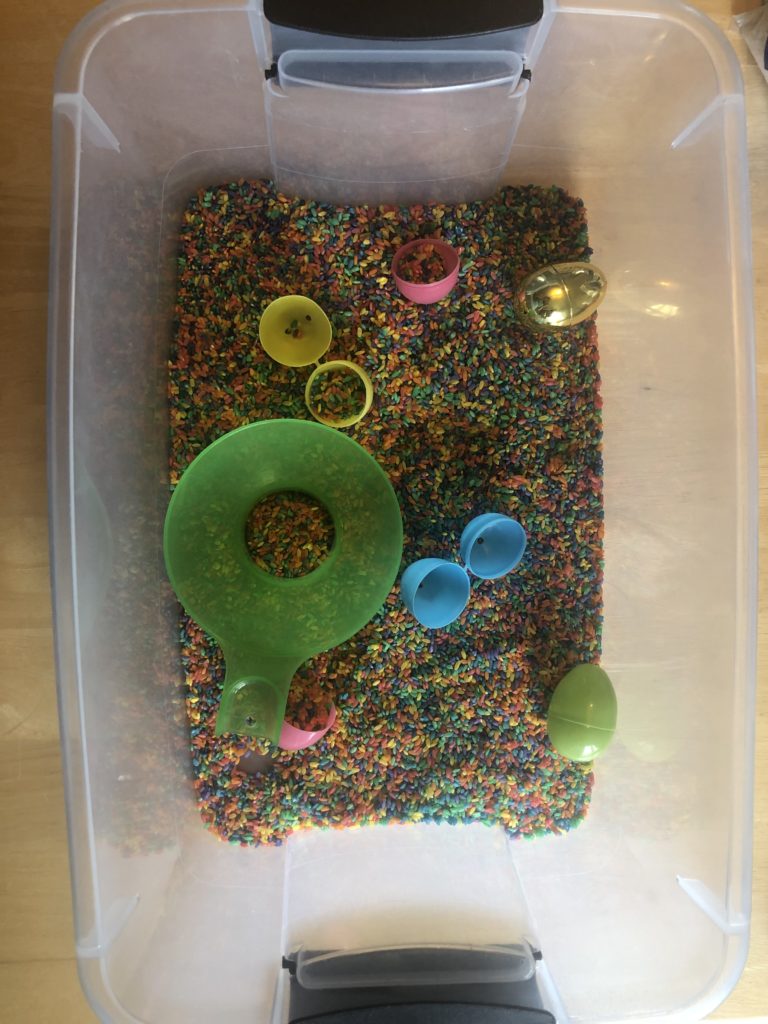
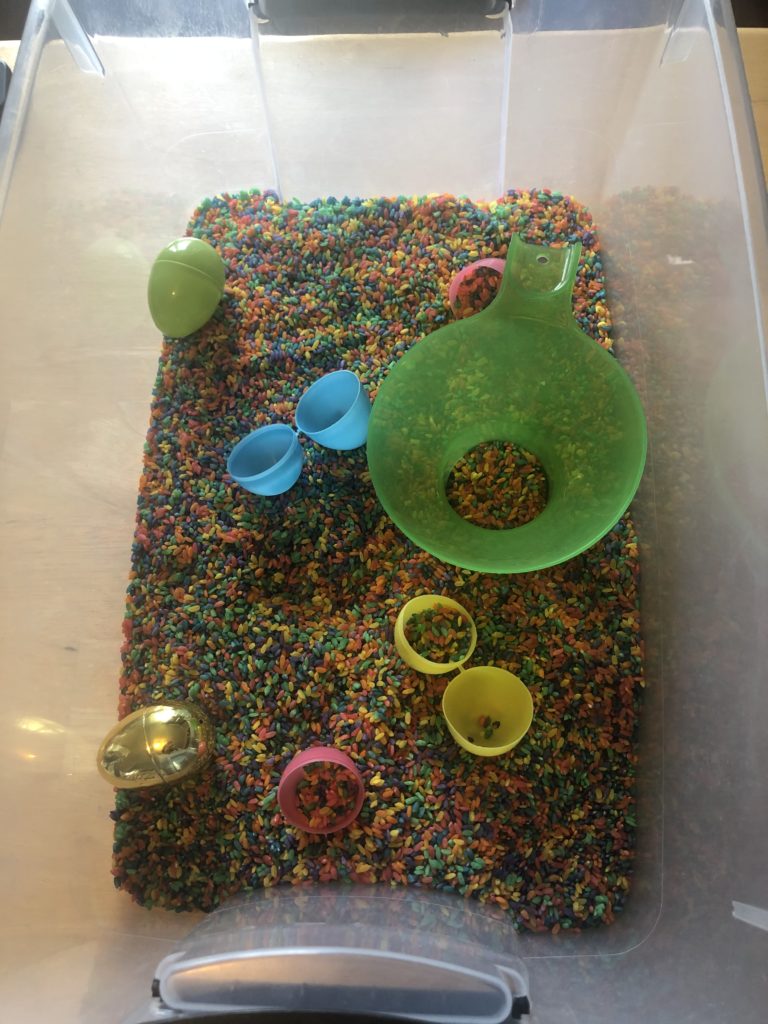
All Versions: Appropriate size storage bin or large baking tray to hold materials Easter Egg Bin: Colored Rice, Plastic eggs, funnel
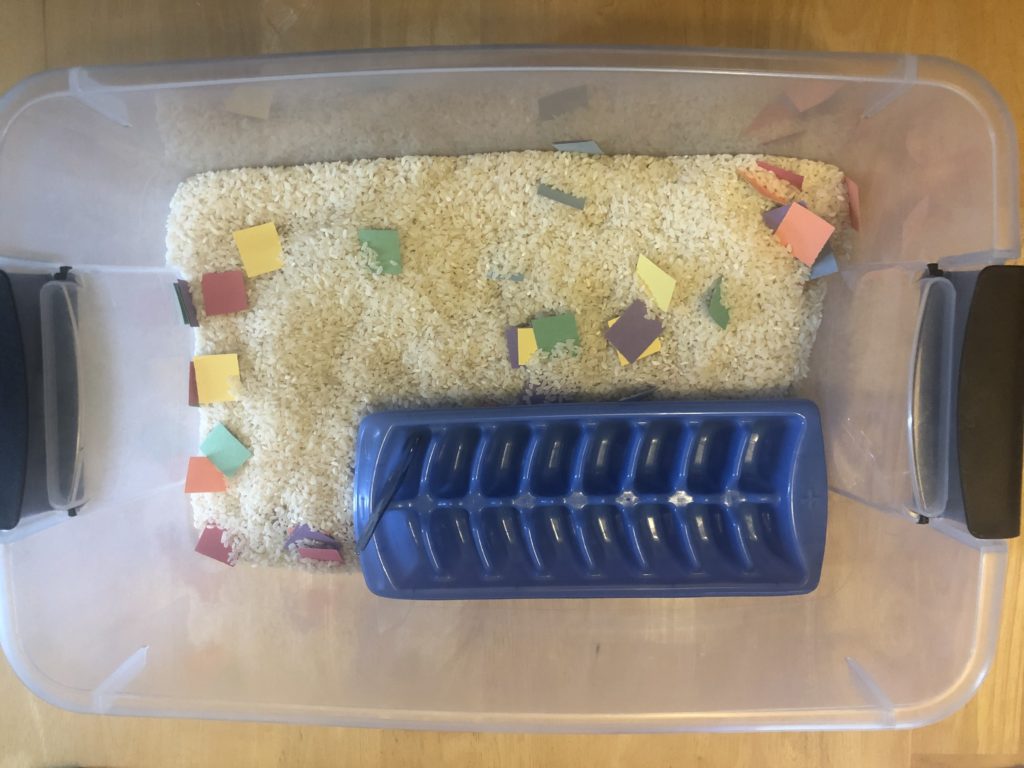
Sorting Bin: White or brown rice, tweezers, different colored paper squares, ice cube tray
Ice Cold Bin: Freezer safe containers, small toys, pipette or baster, water
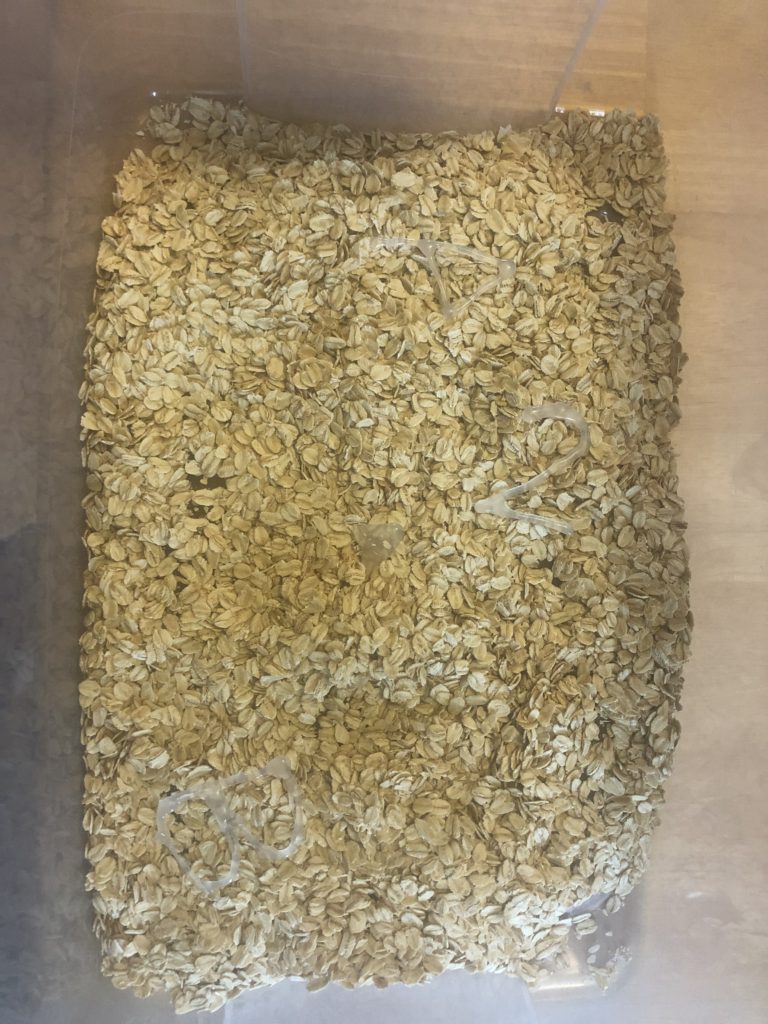
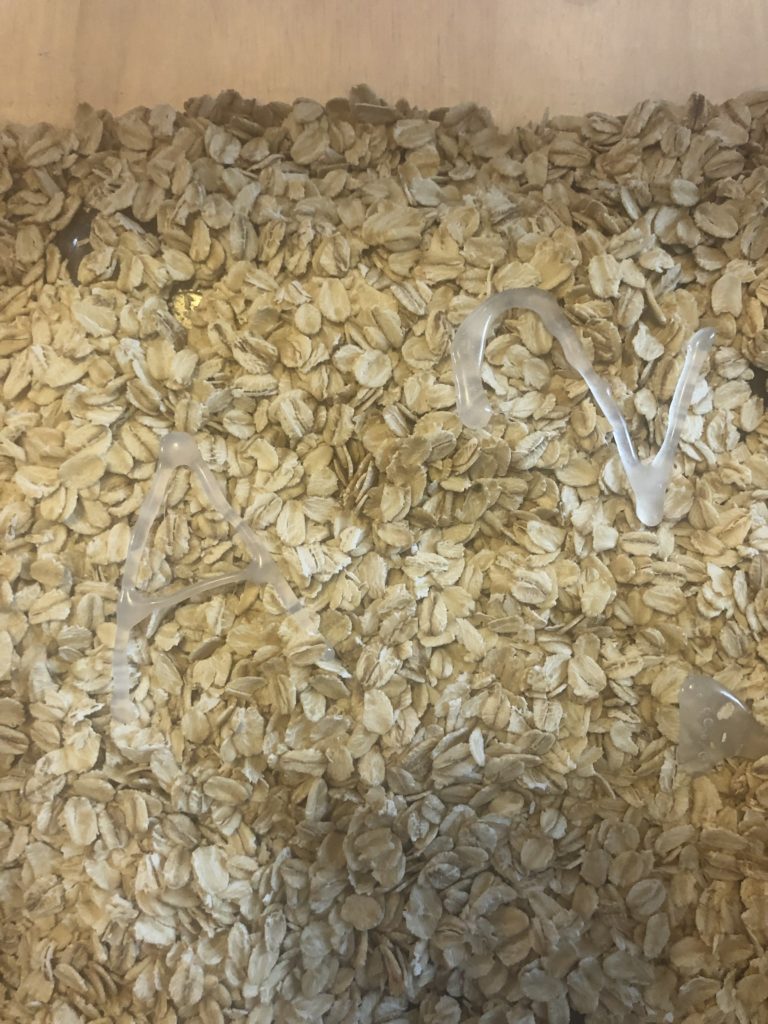
Number/Letter Bin: Oats, Number puzzle, letter puzzle
Length:
Set up: 15 minutes Play Time: Unlimited
academic subject(s):
This lesson supports PreK Curriculum: PK.PDH.1, PK.PDH.2, PK.PDH.5, PK.AC.2
Sensory play is essential to early childhood learning. This type of play engages the different senses of your child, developing their ability to intake and process different sensory stimulation. When your child is playing in a sensory table, they are also developing new language and practicing fine motor skills. Depending on the type of sensory table, this tool can also be used to practice color, number or letter recognition, sorting, pattern making or exploring different states of matter. Below we have shared how to make four different sensory tables – each exploring one or more of these important skills.
This type of play is also beneficial for children on with Autism Spectrum Disorder (ASD) or other sensory processing disorders. During sensory play, the brain is stimulated to help improve sensory processing systems. Additionally, by playing with your child or having siblings play together, sensory play helps to improve social skills including sharing, cooperation and communication.
These sensory tables also have the added benefit of being a quiet, calming activity for children. Adding a sensory table into your daily routine will provide a stimulating yet calming element to your child’s home education. This is a great type of activity to put out for your child when you need a quiet home to accomplish an important task while working from home, allow younger kids to nap or just to calm down yourself!
Directions:
Easter Bin: With the holiday around the corner I decided to do an Easter themed sensory bin. However, this type of idea can be used anytime without a holiday theme. With this type of bin, your child is practicing the fine motor skills of scooping, pouring and filling. For our Easter theme, I used plastic eggs as the scoopers. However, you can use spoons, small bowls or cups or really anything that your child can scoop with! I also included a funnel for more precise pouring practice.
This bin is easy to set up and just requires dumping of all materials into an appropriate size bin! You don’t need to use colored rice if you don’t have the ability to make any, but it does add a more festive feel for our Easter theme and more opportunity for sensory processing. For even more sensory stimulation, you can add essential oils to the bin to engage your child’s sense of smell.
Sorting Bin: This bin requires slightly more prep work as you need colored squares. Simply cut up different colored construction paper into squares. These squares will be vibrant against the plain white or brown rice used in the base of this bin. I recommend using kid-safe, plastic tweezers for the sorting of the paper pieces. Depending on where your child is in their fine motor development simply pinching with their fingers might be all the practice they need today!
Once the rice and colored squares are dumped into the bin, place the ice cube tray off to the side, either next to or inside of the bin. Your child can then practice sorting the paper pieces by color in the tray.
*Extension Activity*
Have your child take the paper pieces out of the tray and create a pattern on the ground or table in front of them. Can you start a pattern for them that they need to continue?
You can also use these paper squares for art projects later! For more ideas, go to our Sanity Savers page.
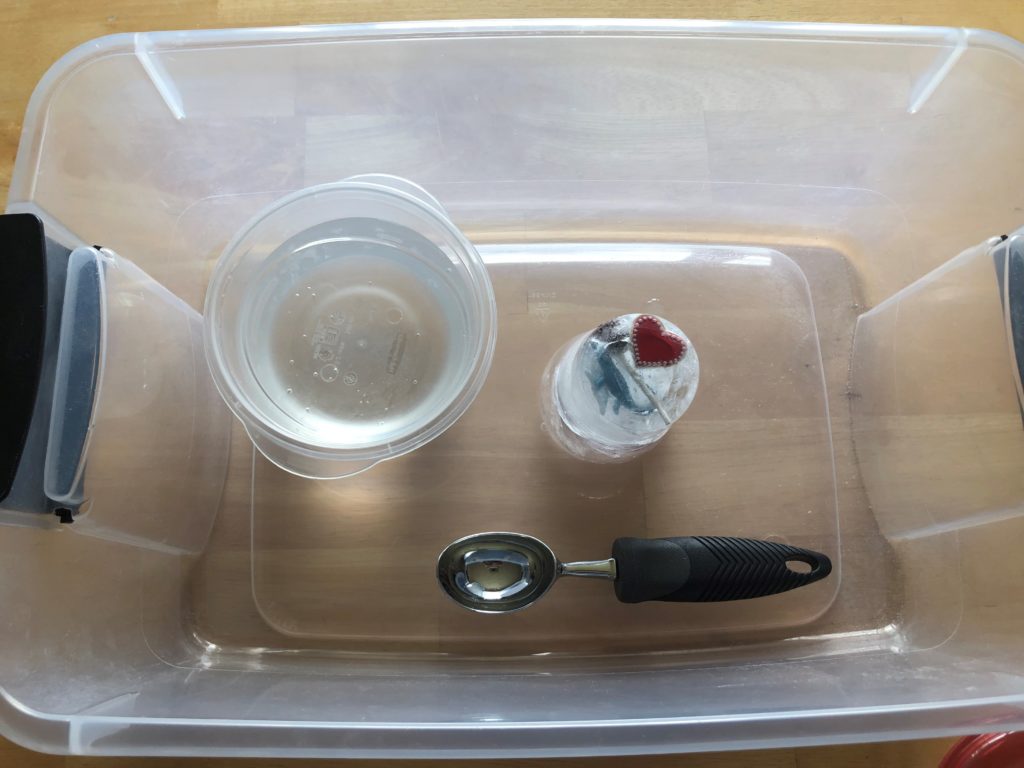
Ice Cold Bin: This is a great bin to stimulate the senses! Through play in our Ice Cold Bin, children will develop a hands on understanding of solids, liquids, hot, cold and freezing! Keep in mind that this particular bin does take some overnight, inactive prep.
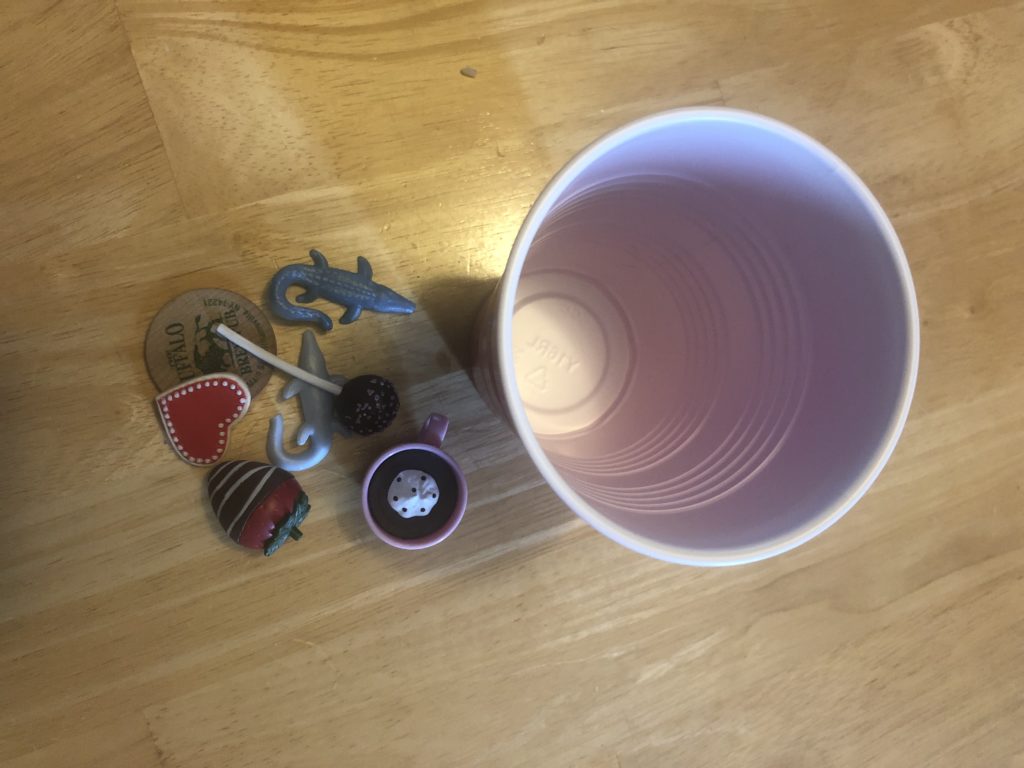
1. Gather some toys. Please be mindful of your selections not to take anything that could be a choking hazard. Have your child help you select some of these toys. Involving them in the prep of this activity provides some great learning opportunities.
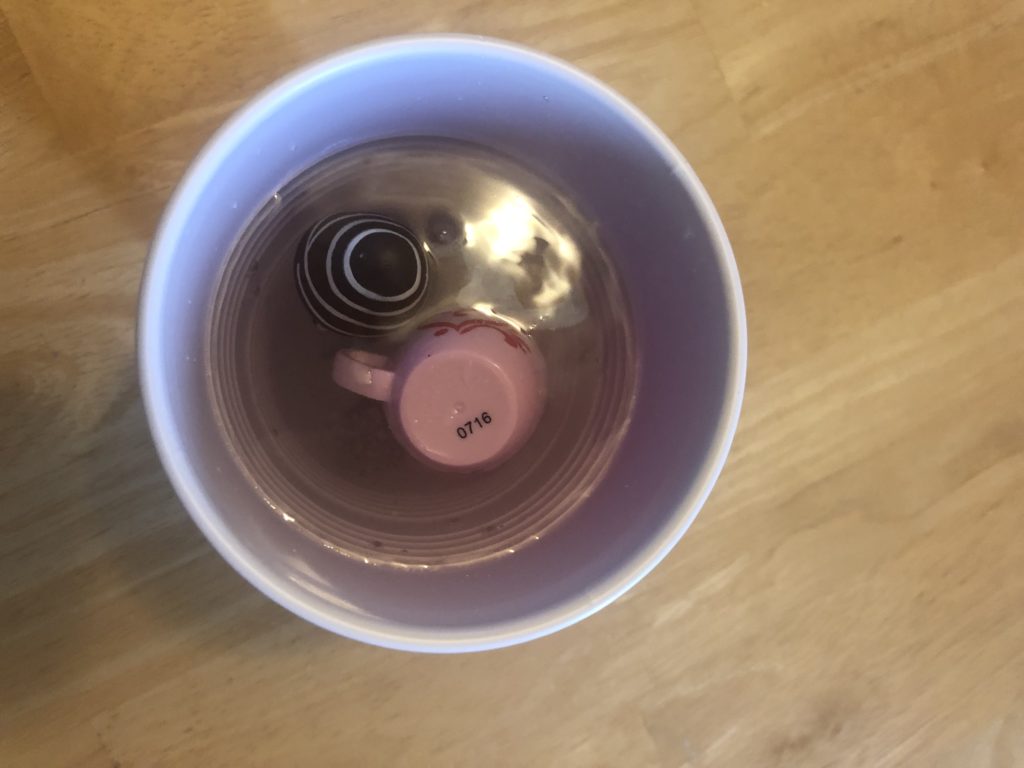
2. Place the toys in a freezer-safe bag, cup or other container. You can be creative here and freeze several different sizes/shapes. Fill the freezer-safe container with water to cover the toys. Have your child observe the toys before putting them in the freezer. Did any of the toys float? Did any sink? Why do you think that happened?
3. Once you have finished your sink/float discussion, carefully place the container in the freezer over night.
4. When the container is completely frozen, remove it from the freezer and place it in a deep storage bin. Pour a small amount of water in the bin with frozen toys. You can add scoops or pipettes/basters to the bin to allow your child to pour and squirt water onto the frozen block. Your child is now ready to play!
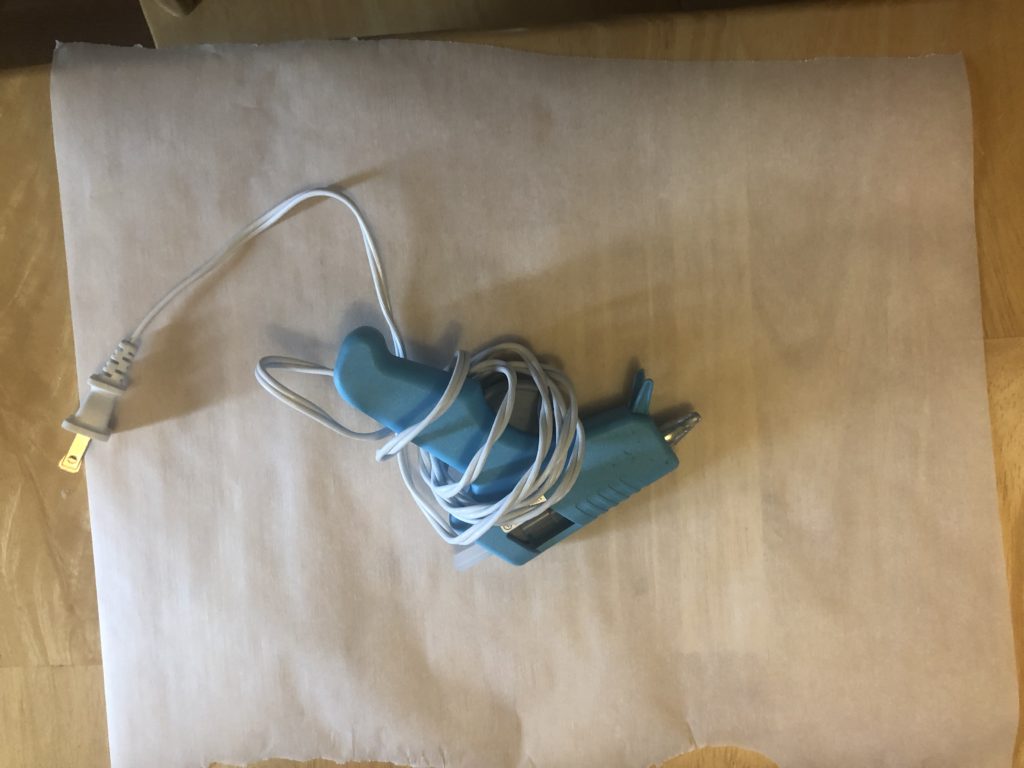
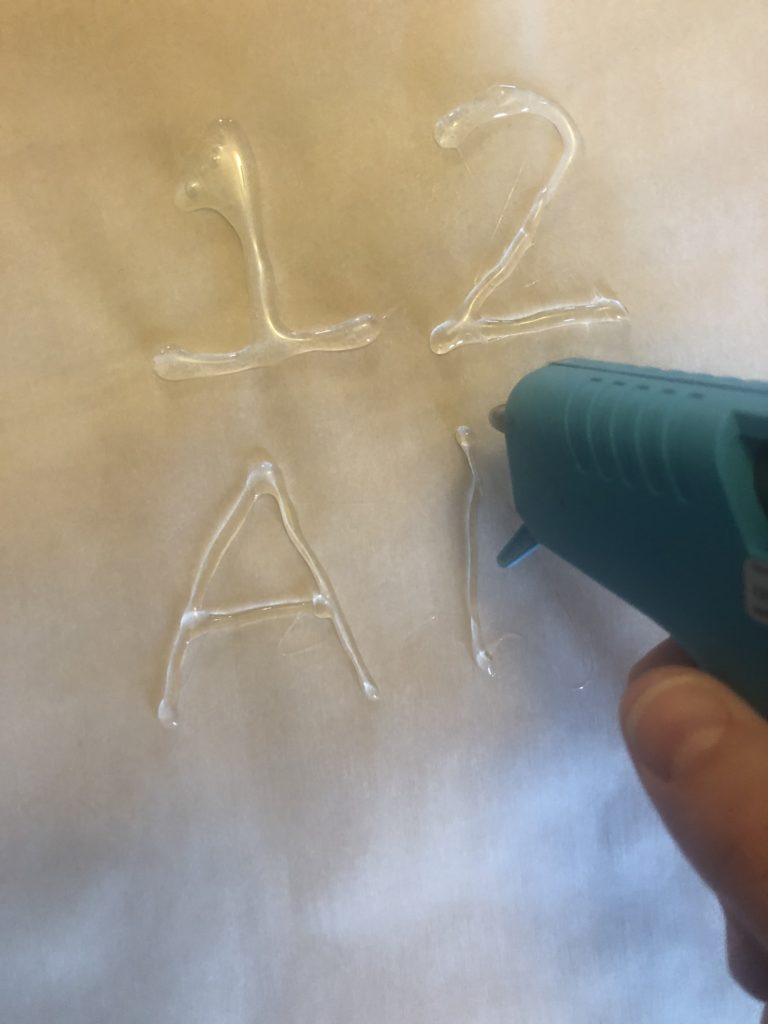
Number/Letter Bin: This number/letter recognition bin is another simple dump and play bin… assuming you have number and letter puzzles at home! If you are like me and you don’t have those you can still create this bin using hot glue or liquid glue (requires much longer dry time). To make your own letters/numbers follow the steps below:
1. Plug in hot glue gun (be careful using this with younger children around) and let it warm up.
2. Place wax or parchment paper on the table.
3. Once the glue gun is hot, use it to write the number 0-9 and the letters of the alphabet.
4. Allow them to dry then dump them in the bin with the oats and you are ready to play! *If you are using regular glue follow steps 2-4 and just note the dry time could take overnight or longer.
* **Extension Activity**
If you child already recognizes all of their letters and numbers you can provide them with the following challenges: · Find the letters to spell your name. · Add in lowercase and uppercase letters and have your child match the lowercase letter to the uppercase pair. · Find the number of their age · Count the numbers out in order · Count the numbers out backwards
Be creative with these! You could make a car wash, develop a farm scene or construction site. The possibilities are endless with sensory tables. Look around your home and use the materials you have to create a fun, stimulating sensory bin!
Vocabulary Words
· Fine Motor: Skills that require greater control of the small muscles than large ones, especially for hand-eye coordination or for precise hand and finger movement. · Frozen: To become hardened into a solid. An example of this is putting water in the freezer and it become ice. The ice is frozen water. · Funnel: A tube with a wide opening at the top and a narrow opening at the bottom that is used to pour liquids or solids into a small opening. · Sink: When an object becomes submerged in a liquid. · Float: When an object rests on the surface of a liquid. · Liquid: A substance that flows freely but remains consistent in volume. Examples include: water, oil or milk. ·Solid: A substance that is firm and stable in shape. It does not flow freely like water. Examples include: the table, toys, chairs etc.
Some kind of building supplies (blocks, magna tiles, duplos, plastic cups) Construction paper Tape Ruler (optional) Crayons or Markers Stickers/Foam Shapes/Gems (optional)
Length:
Set up: 5 minutes Active: 20-30 minutes
Academic Subject(s):
Art, Math, Science This lesson supports your student’s curriculum: PreK.ARTS.16 K.ARTS.17 1.ARTS.17 MST PK.G.A MST K.G.A, K.G.B MST 1.G.A.2 MST 2.G.A.1 SCI K-2-ETS1-2 This lesson supports areas of Early Childhood Development and PreK Curriculum: · PreK Standards: Fine motor skills such as learning to cut with scissors and drawing lines. This activity additionally supports the Visual Arts Standard of inventing and discovering to create with the castle building activity.
Directions:
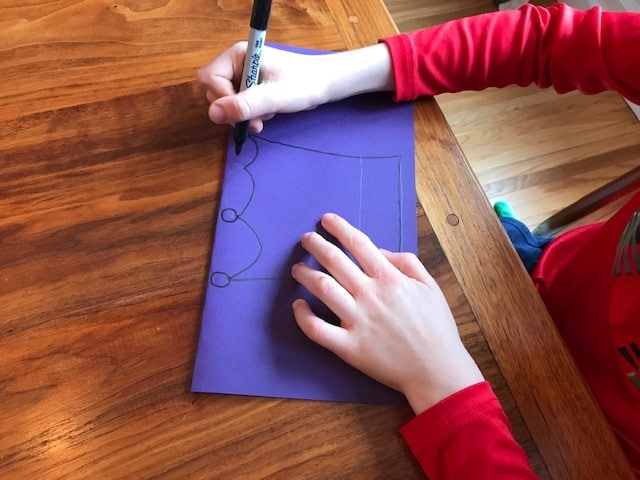
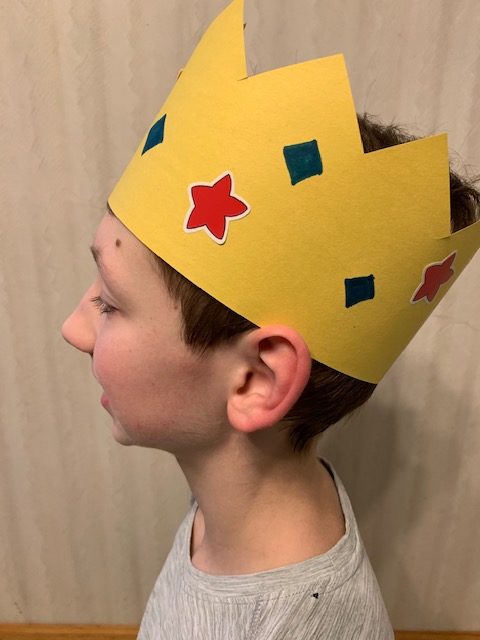
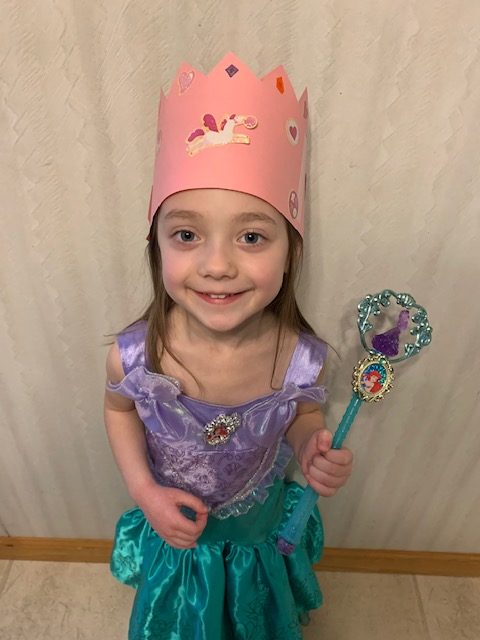
King/Queen Crown: Step 1: Gather colorful construction paper, tape, markers and any additional embellishments that you would like to add to the project that you might have available in the house.
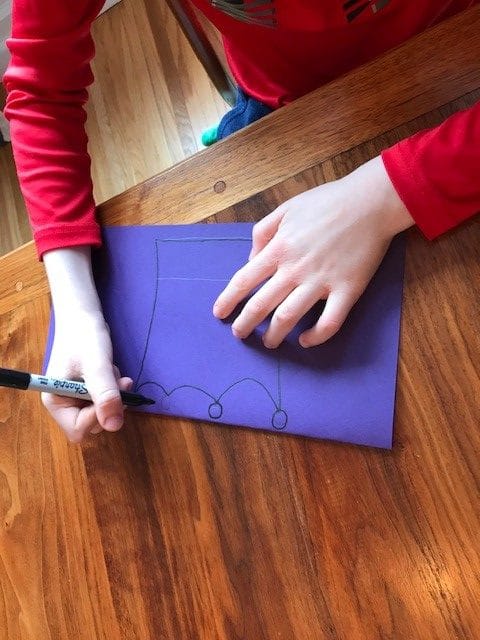
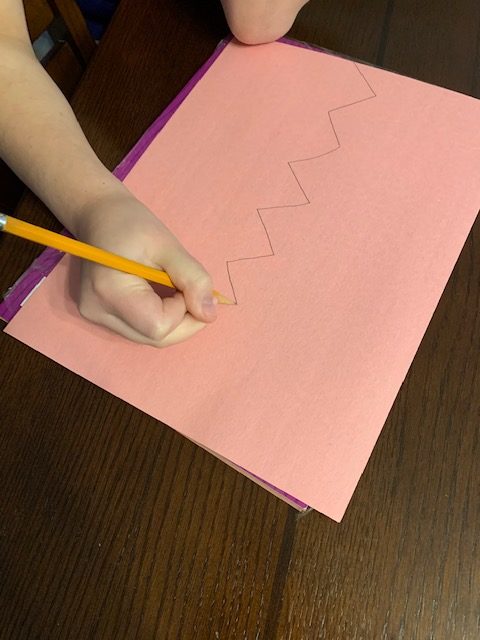
Step 2: Have child choose what color paper they would like and then draw a zigzag line in the middle of one piece of construction paper lengthwise using a pencil. Drawing lines like this takes a lot of practice and may be easier for older children. It’s a great fine motor skill for PreK and K students to attain though, so be patient as they focus and try! Having them use a ruler to make the zigzag lines may help.
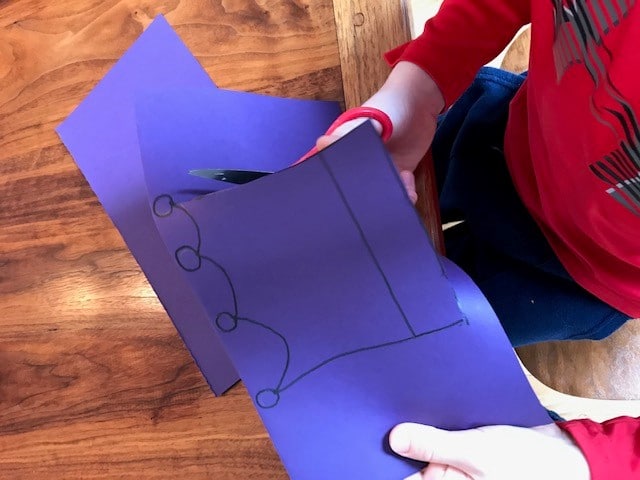
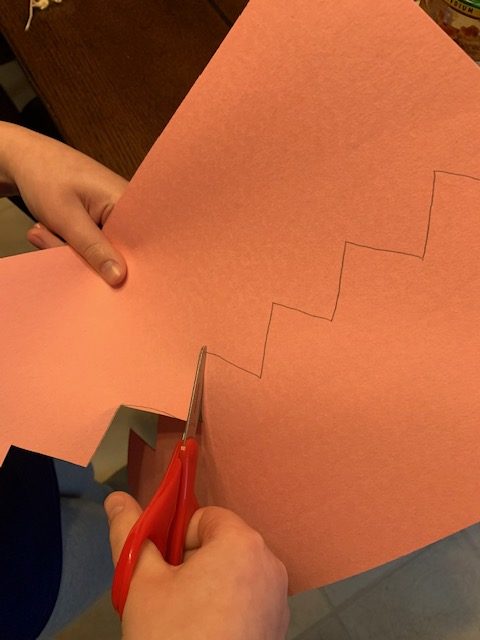
Step 3: Cut along the zigzag line with child safe scissors. Check your child’s scissor usage, making sure the thumb is in the circular hole and that the thumb is above the other four fingers. Mastering cutting with scissors is also an essential skill for kids of all ages, so keep encouraging your child as they work on cutting up and down the zigzag lines.
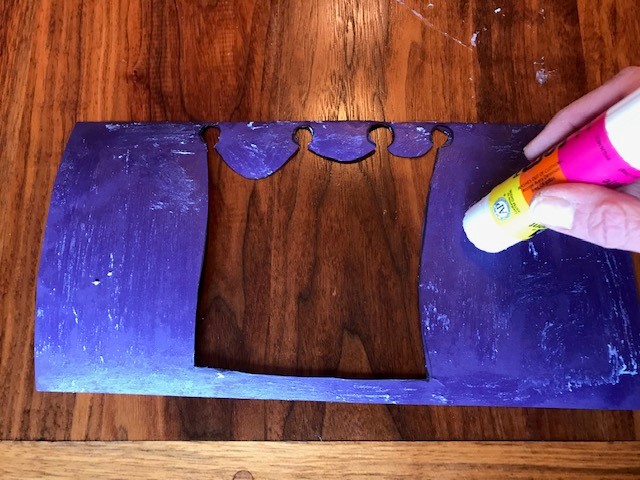
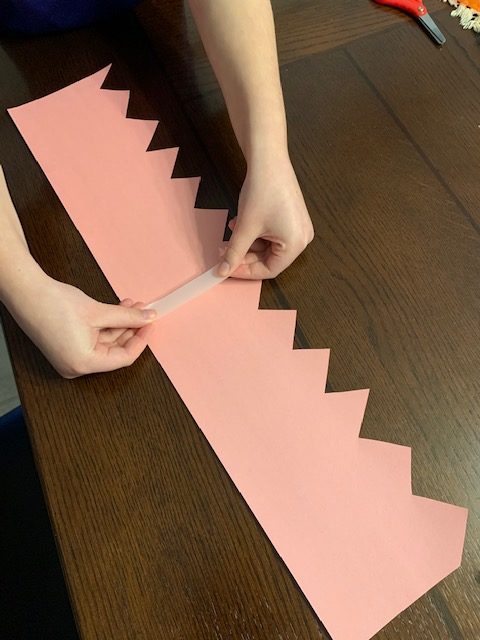
Step 4: Once the line is fully cut, you should have two halves of paper. Line up the two papers lengthwise and tape them together. Decorate the crown with crayons, markers, stickers, embellishments, etc. Allowing your child to personalize their crown will give them a sense of ownership and accomplishment!
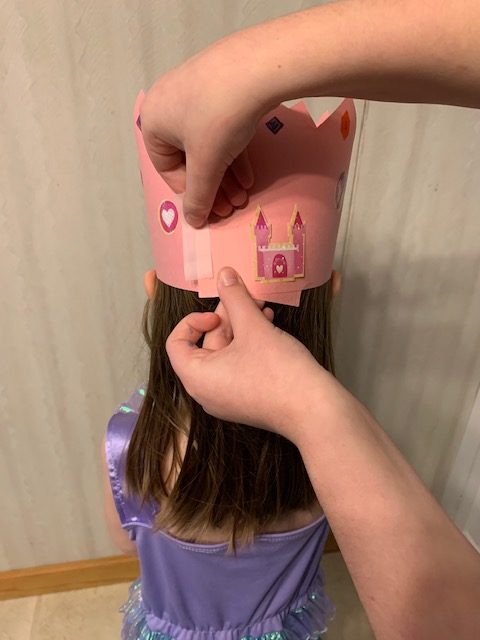
Step 5: Measure the paper strip around your child’s head for proper fit and tape the other two edges together (overlap the paper if need be for fit).
Step 6: Talk together about what other ways they can be more like a King or Queen in addition to their crown. Wearing a play costume? Using a pretend wand or scepter? Wearing special dress up clothing or a robe to feel like a royal? Enjoy playtime with your young King or Queen for the day, and ask them what rules they would make if they ruled the land!
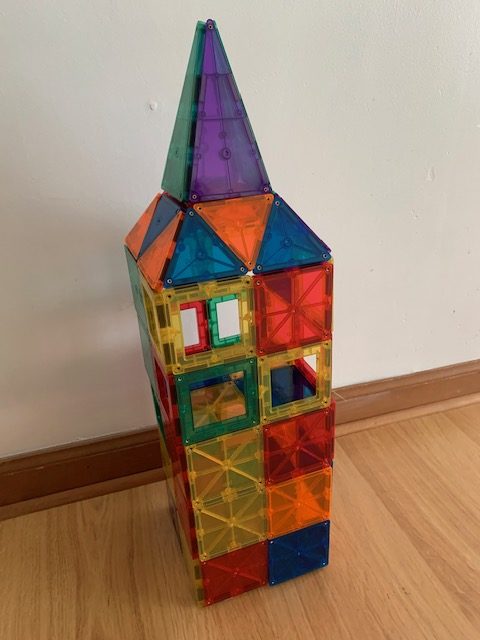
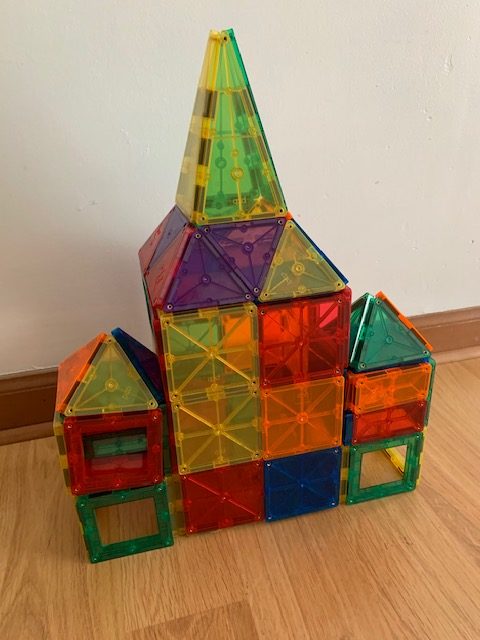
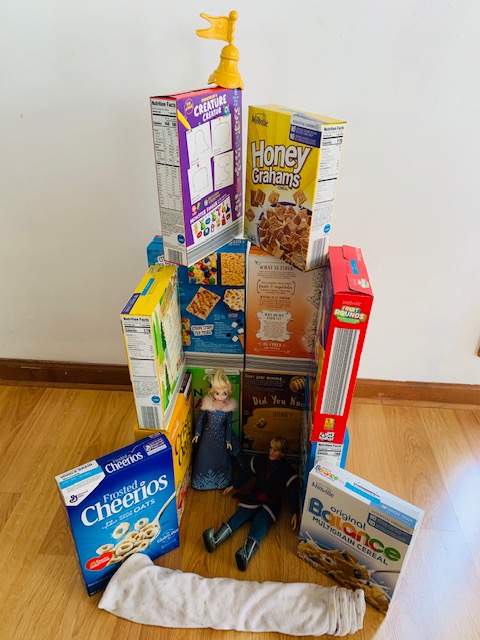
Castle Building: Step 1: Choose something that you have around the house that a child could build with such as children’s blocks, magna-tiles, Duplo blocks, cereal boxes, plastic drinking cups, etc.
Step 2: Let their imagination run wild! See what kind of castle they would build if they were the King/Queen of the land!
Vocabulary Words
· Embellishments – a decorative detail or feature added to something to make it more attractive · Lengthwise – in a direction parallel with a thing’s length · Royal – having the status of a king or queen or a member of their family