Polish Heritage Sanity Saver: Wycinanki

Created in partnership with the The Permanent Chair of Polish Culture at Canisius College.

By Amelia Schrader, Senior Manager of Education

Download a PDF version of this lesson here!

ACADEMIC SUBJECT(S):

Social Studies, Art

DEVELOPMENT SUBJECT AREAS:

Appreciating Diversity
Adaptive Social Behavior,
Empathy , Fine Motor Skills

HOW LONG WILL THIS TAKE TO DO?

20-30+ minutes

MATERIALS

• Scissors
• Colored Paper
• Glue
• Pencil
• Images of Wycinanki for inspiration

This lesson is brought to you by the Permanent Chair of Polish Culture at Canisius College. Explore & More is thrilled to partner with this organization to showcase Polish traditions, heritage and culture through activities, stories and food. Poland is a country located in central Europe. There are many people in Buffalo and WNY that have roots in Poland. Our community celebrates many Polish traditions at Easter, Christmas and throughout the year. We hope you enjoy these Polish activities and think about incorporating some of them in your family’s yearly traditions!

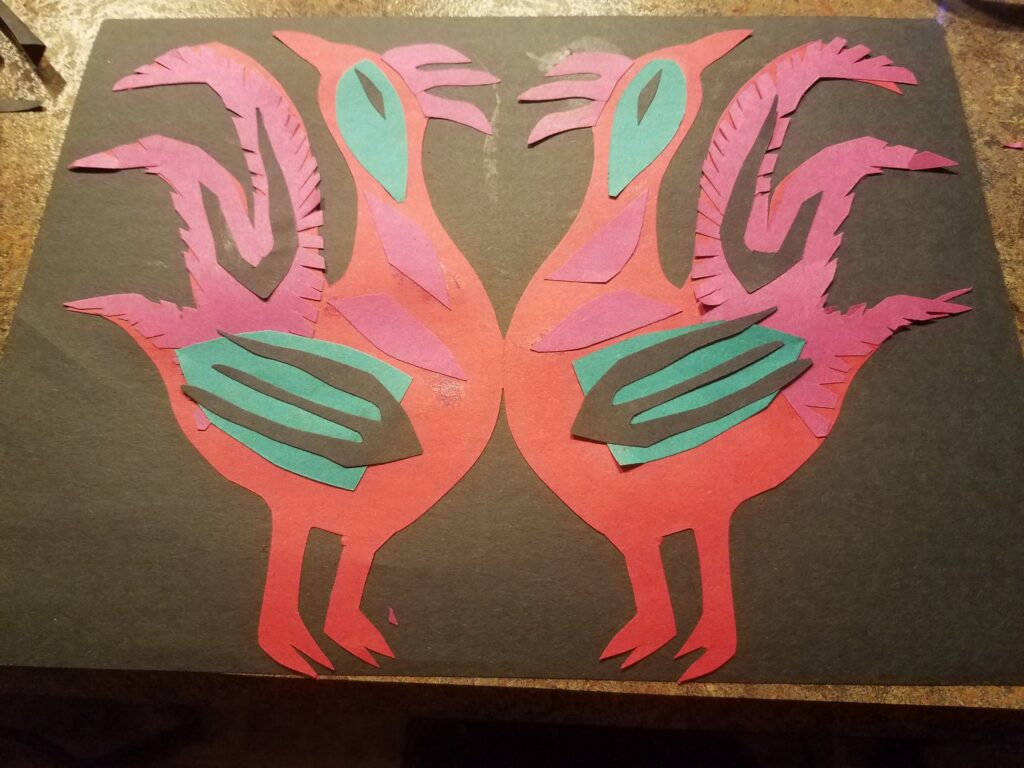
“Wycinanki” pronounced Vee-chee-non-kee is the Polish word for “paper-cut design.” This polish folk arts tradition dates back over 150 years and is one of the most widely recognized Polish traditions. The style and subject matter of wycinanki vary based on the region of Poland. This beautiful tradition has been passed down through generations, often becoming more detailed with each new generation.

The two most distinct styles of wycinanki come from Kurpie and Łowicz. Designs from Kurpie are characterized as one cut out, usually a symmetrical design and done in a single color. While designs from Łowicz consist of cut outs in many vibrant colors layered on top of one another and secured with glue.

Directions

STEP 1 Take a few minutes with a grown up to look through some
images of wycinanki folk art. These beautiful images will be used as
inspiration for your creation!

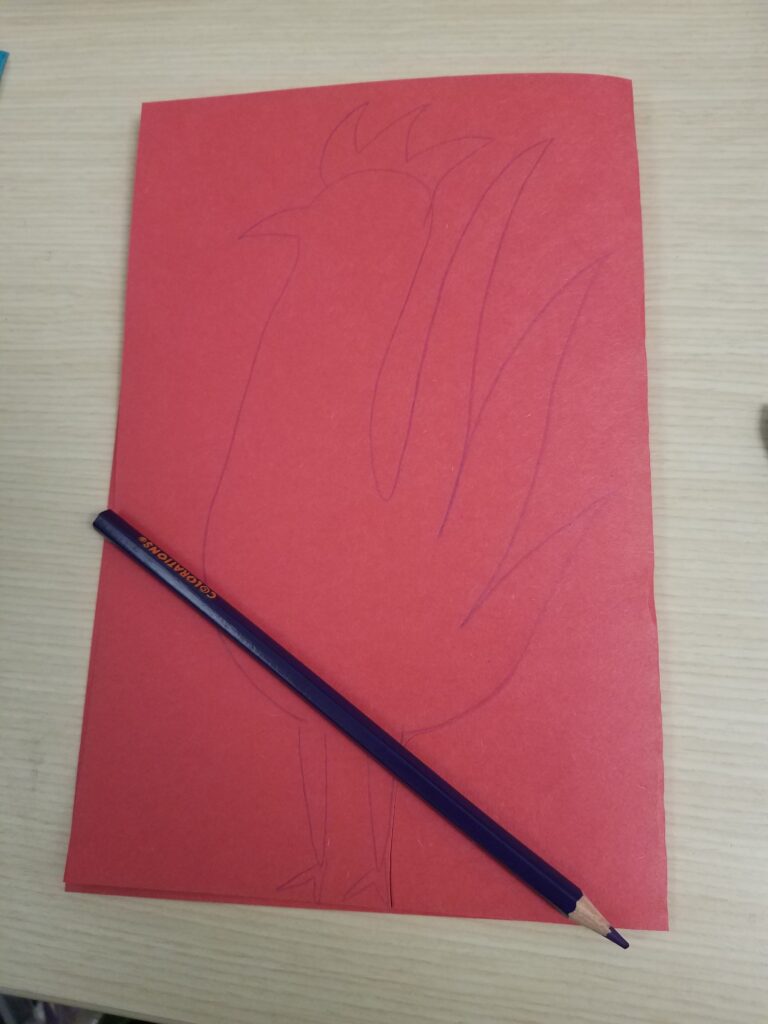
STEP 2 Now it is time to start planning out your design. Begin by selecting
a color of paper and folding it in half. Using a pencil begin sketching out half of your design on the folded paper. Make sure portions of your drawing come to the edge of the fold. Sketching in this way and using the fold of the paper will create the symmetry that is found in both styles of wycinanki.

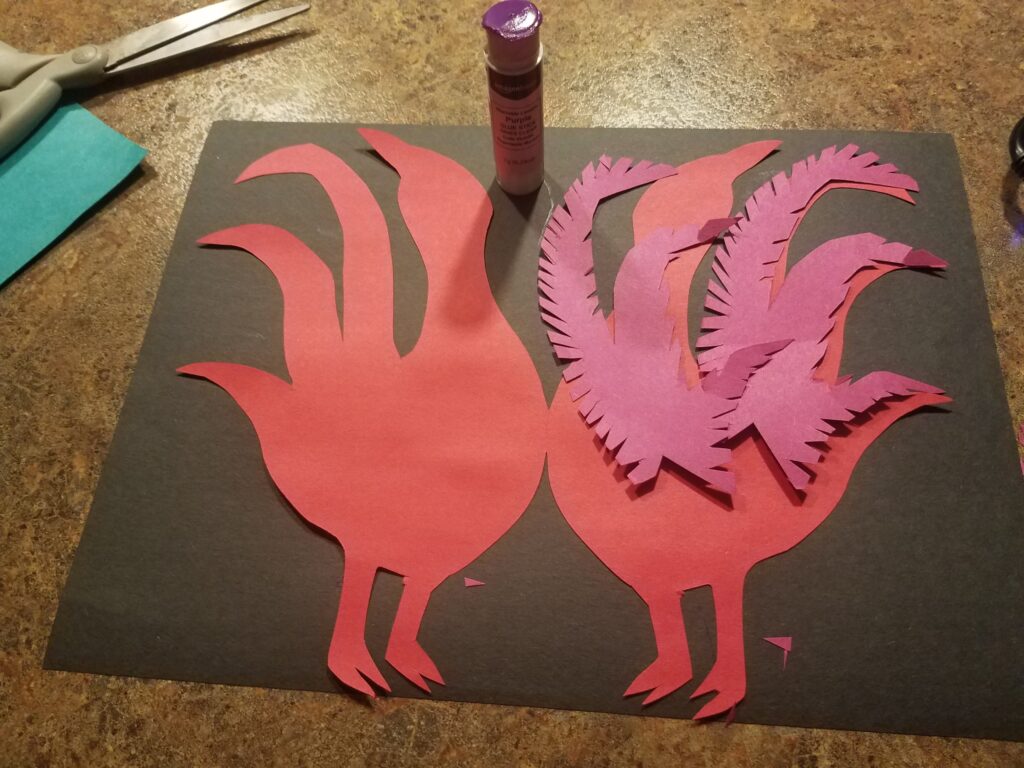
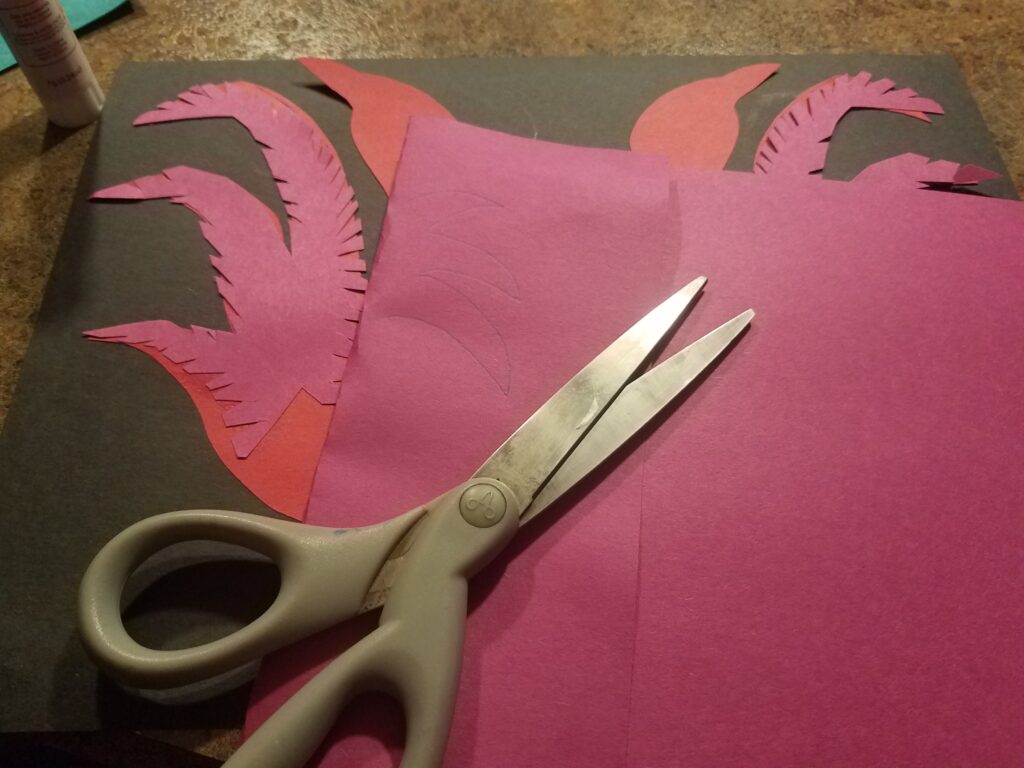
STEP 3 Repeat this process in different colors creating the
various layers of your wycinanki art.

STEP 4 Using glue, carefully secure the layers of your wycinanki
together to form your final design!

Once your wycinanki is finished share your unique designs with
Explore & More by tagging us on social media!

VOCABULARY

WYCINANKI: Pronounced Vee-chee-non-kee is the Polish word for “paper cut design.”

SYMMETRY: When a shape or object has two completely identical sides that are facing each other or around an axis.

KURPIE: A region in Poland known for its unique traditional costumes, dance and architecture. The Kurpie region also has its own distinctive wycinanki style that consists of a single color cut out folded one single time.

ŁOWICZ: Located in central Poland, Łowicz offers its own unique style of wycinanki. Characteristics of this style consist of multiple vibrant colors cut out on separate sheets of paper and glued together in layers. Typical motifs of this region include flowers, roosters and geometric patterns.

For more Storytime stories click here!

Sanity Savers: Rudolph the Red-Nosed Reindeer

Written by Jacalyn Slingerland
Lead Play to Learn Facilitator

Download a printable PDF version here.

MATERIALS

• 1 Packet of hot cocoa
• 1 Clear cone bag
• 2 Googly eyes
• 1 Glue stick
• 1 Brown pipe cleaner
• 1 Red pompom
• A clean working surface

HOW LONG WILL THIS TAKE TO DO?

SET UP

5 minutes

ACTIVITY

15 minutes

ACADEMIC SUBJECT(S):

Art
VA: CR 1.2. 1,2,3a

DEVELOPMENT SUBJECT AREAS: Fine Motor Skills Literacy

Social and emotional development

This lesson allows your child to create a reindeer craft, while also enjoying some delicious hot cocoa. This lesson will emphasize creativity and help with social and emotional development of your child.

Rudolph was a little reindeer who was teased for being different. He had a big shiny red nose! Rudolph first didn’t like being different, however, it turned out that his red nose made him special. Do you have anything that makes you special? If your friends or classmates are different, what are some ways you can make them feel special and appreciated?

To celebrate the holidays, we will be making a yummy and creative treat! Let’s decorate a plastic bag and turn it into a familiar little reindeer with a red shiny nose. After decorating we can have some sweet hot cocoa.

DIRECTIONS

STEP1 Glue googly eyes and one red pompom to the cone bag to resem-ble a face.
STEP 2 Wash your hands, and make sure your working surface is clean! STEP 3 (optional) Separate the marshmallows from the hot chocolate.
STEP 4 Pour hot chocolate into the bag.
STEP 5 Pour marshmallows into the bag.
STEP 6 Wrap the top of the bag with the pipe cleaner.
STEP 7 Fashion the left-over pipe cleaner into antlers.
STEP 8 Admire your creation and treat yourself to some hot cocoa!

VOCABULARY

MAYA: A group of indigenous people in Mexico and Central America.
COCOA SEEDS: The dried partly fermented seeds of a South American evergreen tree that are used in making cocoa, chocolate, and cocoa butter.

For more Storytime stories click here!

Sanity Savers: Frosty the Snowman

Written by Jacalyn Slingerland
Lead Play to Learn Facilitator

Download a printable PDF version here.

MATERIALS

• 1 Clear ornament
• Orange construction paper
• 2 six inch pieces of ribbon
• 1 Glue stick
• 1 black marker
• Scissors (*With parental supervision)

HOW LONG WILL THIS TAKE TO DO?

SET UP
5 minutes

ACTIVITY
15 minutes

ACADEMIC SUBJECT(S):

Art:
VA: CR 1.2. 1,2,3a Math: NY-PK.MD.1 NY-PK.G.1 NY-PK.G.3

DEVELOPMENT SUBJECT AREAS: Fine Motor Skills

• 10 Cotton balls
• 2 Googly eyes (optional)

This lesson allows your child to get their creative side working, by making their own snowman themed ornament. This project gives your child an opportunity to discuss measurement, addition, counting, and shapes.

Building a snowman is fun no matter how you do it! We used a clear ornament for our craft, and you can find these at the dollar store, or you can order them online. Feel free to get creative too! What do you think you can use instead? Maybe a plastic bag or wrapping paper. Take this opportunity to talk about shapes and numbers with your littles. Can you count the cotton balls? Do you see any circle shapes? How about triangles?

DIRECTIONS

STEP 1 Open the ornament and fill it with cotton balls.
STEP 2 Use your scissors to cut out a carrot nose from your orange paper.
STEP 3 Glue googly eyes onto your ornament.
STEP 4 Glue the carrot nose onto your ornament.
STEP 5 Measure and cut a piece of ribbon provided. Wrap and glue it around your orb.
STEP 6 Hang up your ornament! Doesn’t it look just like a snowman?

VOCABULARY

SPHERE: A round solid shape in which the surface is the same length from its center.
ORNAMENT: A thing used to make something look more attractive but usually having no practical purpose, especially a small object such as a figurine.
TRIANGLE: A shape with 3 straight sides.

For more Storytime stories click here!

Sanity Savers: Make Your Own Binoculars

Written by Jacalyn Slingerland
Lead Play to Learn Facilitator

Download a printable PDF version here.

MATERIALS

• 2 craft tubes
• 2 1⁄2 Feet of ribbon
• Scissors
• Pom poms
• 1 Glue stick
• Ruler
• Stickers

HOW LONG WILL THIS TAKE TO DO?

15 minutes

ACADEMIC SUBJECT(S):

Art, Math
VA: CR 1.2. 1,2,3a NY-PK.MD.1 NY-PK.G.1 NY-PK.G.3

DEVELOPMENT SUBJECT AREAS:
Fine Motor Skills
Social and emotional development

This lesson allows your child to explore imaginative play after creating their own binoculars. The craft project gives an opportunity to discuss measurement, addition, counting, and shapes.

This craft is extra special because once it’s complete it will help spark imaginative play. Binoculars are used to see things far away, what do you and your child see while looking through the binoculars? You can go on an indoor or outdoor adventure. A jungle expedition, birdwatching, anything!

DIRECTIONS

STEP 1 Have a grown up carefully make a hole in each craft tube using scissors.
STEP 2 Thread your holiday ribbon through the holes and tie at the end so it stays.
STEP 3 Glue the two craft tubes together.
STEP 4 Decorate using stickers and pom poms.
STEP 5 Look through your binoculars! Who do you see?

A fun side activity is to play I-Spy with your new binoculars!

VOCABULARY

MAGNIFY: To make something appear larger than it actually is.
OBSERVE: To watch or see something.
LENS: A clear piece of glass that helps to magnify objects that are far away.

For more Storytime stories click here!

Sanity Savers: 12 Drummers Drumming Activity

Written by Jacalyn Slingerland
Lead Play to Learn Facilitator

Download a printable PDF version here.

MATERIALS

  • A piece of craft foam
  • Markers
  • Scissors
  • A recycled, clean cylinder plastic container (such as a coffee can)

ACADEMIC SUBJECT(S):

Art, Music, Literacy VA: CR 1.2. 1,2,3a

DEVELOPMENT SUBJECT AREAS: Fine Motor Skills Gross Motor Skills

• Stickers • Ribbon • Glue

HOW LONG WILL THIS TAKE TO DO?

10 minutes

This lesson allows your child to create a working drum! They will be able to create their own rhythm or drum along to a song.

“On the 12th day of Christmas my true love gave to me 12 drummers drumming”. You can be a drummer too! Once you build your drum, can you drum along to the 12 days of Christmas? Can you make up your own rhythm? After decorating your drum, you may also write a wish list to Santa; or a thank you note. Is there anything special that you wish for? What are you thankful for this holiday season?

The 12 Days of Christmas was published in England in 1780 without music. It was instead a rhyme or a chant. The “12 days of Christmas” began on December 25th and would end January 5th.

DIRECTIONS

STEP 1 Take your piece of craft foam and place it over your coffee can or similar object.
STEP 2 The foam should fall over your can by a few inches.
STEP 3 If your foam is too long, trim it. I’m making mine into a decorative shape.
STEP 4 Secure the foam top with glue, and ribbon.

STEP 5 Decorate your drum with stickers and/or by using markers.

STEP 6 Your drum is finished! Time to drum!

VOCABULARY

RHYTHM: A strong, regular, repeated pattern of movement or sound.

CUMULATIVE SONG: A song with a simple verse structure modified by progressive addition so that each verse is longer than the verse before.

For more Storytime stories click here!

Field trips are back! Please be aware that it will be busier than usual.