Sanity Savers: Sidewalk Chalk Paint

Sponsored by: M&T Bank

Written By: Amelia Schrader
Senior Manger of Learning and Education 

Materials:

2 cups corn starch
2 cups water
Food coloring (various colors)
Small cups or a muffin tin
Paint brushes or craft sticks 

Length:

Prep: 5 minutes
Play time: Unlimited! (Until the chalk runs out…) 
Academic Subject(s): Art, Science   

Spring is a great time of year to go outside and let your creativity bloom with this fun sidewalk chalk painting activity. Kiddos can help during the making process and then let their imagination soar when it is time to paint!  

Sanity Savers: Sidewalk Chalk Paint

Directions:

Step 1: In a large bowl, mix together the corn starch and water. I used two cups of cornstarch and two cups of water. You can use more or less, depending on how much sidewalk chalk you want to make – just make sure you keep a 1:1 ratio for the mixture.  
Step 2: Pour the even amounts of the mixture into your small cups or the muffin tin. I prefer a muffin tin but you can use anything really!   

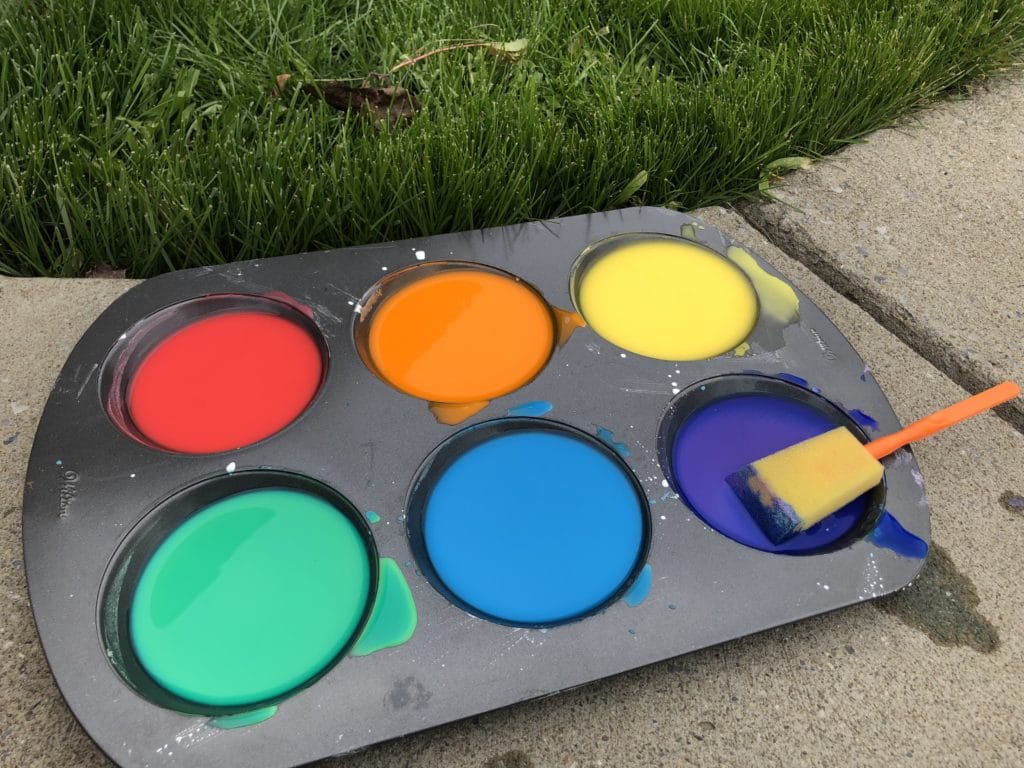
Step 3:  Mix in a few drops of food coloring into each small container. Remember if you want to make red you will need a LOT of food coloring because your mixture is white.   
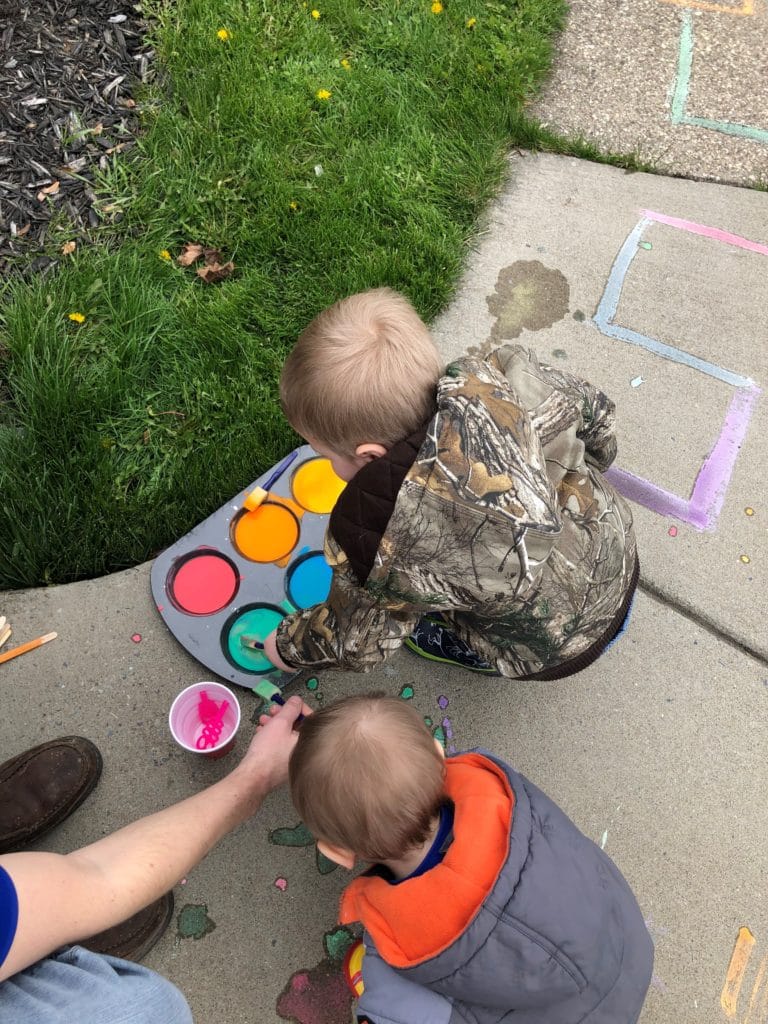
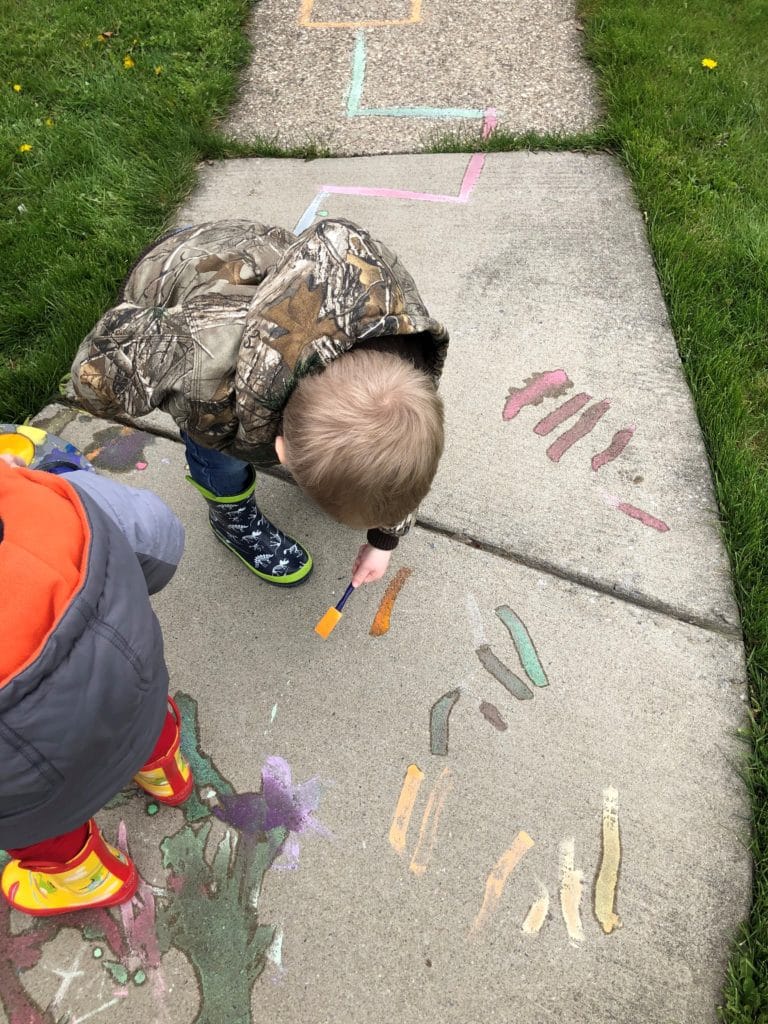
Step 4: Take your sidewalk chalk paint outside and use foam brushes to paint the town!  This simple activity is a great project for a nice spring day! Children will practice fine motor skills of pouring, squeezing and stirring, color recognition, color mixing and grow their creativity!

Make sure you share photos of your chalk paint creations on the Explore & More Facebook page!  

Vocabulary Words

Mixture: a substance that is made by mixing other substances together Primary Colors: These colors cannot be created by mixing together other colors. The primary colors are red, yellow and blue.
Secondary Colors: These colors are created by mixing together two primary colors. The secondary colors are orange, green and purple. Orange is created by mixing red and yellow. Green is created by mixing blue and yellow. Purple is created by mixing blue and red.    

Check out our other Sanity Savers posts here!

Sanity Savers: Tie Dye Snail Shell

sponsored by: M&T Bank

Written by: Will Kawalec
Lead Play to Learn Facilitator

Materials:

Coffee filters
Markers
Glue
Tape
Water dripper (or empty food coloring bottle or spray bottle)
Googly eyes (optional) 

Sanity Savers: Tie Dye Snail Shell

Length:

Set up: 2 Minutes
Activity 5-25 Minutes  

Academic Subject(s):

Art This lesson supports Pre-K – 2nd Grade Arts Curriculum:
VA:CR2.1PK-2 
This lesson supports areas of Elementary Education and elements of Pre-K.

All of those adorable art projects your little one comes home from preschool are great examples of learning through play and hands on exploration to gain knowledge of the world. This Tie Dye snail shell is a great opportunity to practice fine motor development, explore color mixing and understand the science concept of diffusion.  

Directions:

Step 1: Trace the coffee filter on your construction paper so you know what size to make your snail. You will use the construction paper again in Step 4.
Step 2: Have child dot the coffee filter with the marker, the filter should not be shaded completely.
Step 3: The child can now drip the water or pour from a very small glass onto the filter, the colors should combine making a tie-dye effect. Move off to the side to dry – drying time will be dependent on how much water you used during this step.  
Carefully squeezing the dropper bottle is great fine motor practice for your little one. I recommend doing this step on a tray with paper towel underneath so you can have a quicker clean up and easily move the coffee filter to dry. *If you do not have a dropper or spray bottle of any kind you can also sprinkle water on the coffee filter carefully with your finger tips.


Step 4: Bring out the construction paper with the traced circle from Step 1. Draw another circle around the traced circle, about 1 inch larger. Add in a neck and head for the snail.
Step 5: Cut out the larger circle and the head/neck of the snail in one piece.
Step 6: Have your adult help you carefully poke a hole in the center of the smaller circle. Once the whole is poked you can use this to help you cut out this smaller, interior circle.
Step 7: Have the child glue or tape their now dried coffee filter, to the snail body (the filter will be the shell). If you do not want to see your tracing lines, once the coffee filter is attached, flip it over and decorate the head on the other side.
Step 8: Attach or hang the snail to a window to see light reflect through the filter.  

Vocabulary Words

Mollusk: Animals that are invertebrates (have no spine) but often have a shell.  These animals usually live in wet or damp habitats.  Snails, slugs, mussels, and octopus. 
Slime: In the case of snails, they use slime to move around it helps them both slide and stick to objects, as well as it keeps their body moist. 
Diffusion: The state of being spread out. For this art project, diffusion occurs when the liquid of the marker ink mixes with the water to spread out across the coffee filter. 

Check out our other Sanity Savers posts here!

Storytime: Clay Moden Reads Cowboy Camp

Storytime: Clay Moden from WYRK Reads Cowboy Camp by Tammi Sauer with the help of his sons, Teddy and Hank.

In our story today Avery is bullied by another camper.
Have you ever had to stand up to a bully for yourself or for a friend?
How did you handle the situation? Avery doesn’t exactly fit in with the other campers right away. But there are still things about Avery that make him very special! What are somethings that are special about you?

For more Storytime Stories check here

Sanity Savers: Binoculars for a Bear Hunt

sponsored by: m&t bank

Written by Amelia Schrader
Senior Manager of Learning and Education  

Materials:

2 toilet paper or craft tubes
Construction paper cut to size of tube
Markers
Tape or Glue
String or pipe cleaners (optional)

Sanity Savers: Binoculars for a Bear Hunt

Length:

Craft Time: 10 minutes
Play Time: Unlimited!  

Academic Subject(s):

Fine motor skills, literacy 

Have you been on a Bear Hunt yet?! Bear hunts are uniting the community as children and their families search windows near and far for bears waiting to be found. Today we are going to make some binoculars in order to help us find bears! You can use these binoculars for so much more than bear hunts including bird watching, scavenger hunts and anything else you can use your imagination to find!  

Directions: 

Step 1: Start by coloring your two pieces of construction paper. They should be pre-measured to wrap around the tube.  
Step 2: Carefully (and tightly) wrap each paper around the tubes individually. Use tape or glue to secure the ends together. If you are using tape, I also recommend taping directly to the tube so the paper does not slide.  

Step 3(Optional): If you do not want your binoculars on a string to wear around your neck you can stop here! If you do want a string follow the next set of steps. I used pipe cleaners but you can also use string or yarn – whatever you have available! I used 4 pipe cleaners, one wrapped around the center of each craft tube. Then attach the two remaining pipe cleaners together and to each end of the ones wrapped around the tube. You may need more or less depending on the size of your child’s head.

Step 4: Now you are ready for your Bear Hunt! With your grown-up, take your binoculars outside and search for bears! How many can you find!
Share a picture on the Explore & More Facebook page with your bear hunt photos!  Sadly, we didn’t find any bears on our bear hunt! But we did find an owl, a butterfly and several dogs.
What types of things can  you find on a bear hunt other than bears? 

Vocabulary Words

Binoculars: an object with one lens for each eye (bi – meaning two) used to see objects that are far away
Bear Hunt Game: Community members all over the country are participating in a bear hunt! People are placing stuffed animal bears in their windows and children are going on bear hunts to find them! You can start your bear hunt by reading the story We’re Going on a Bear Hunt by Michael Rosen and Helen Oxenbury.  

Check out our other Sanity Savers posts here!

Sanity Savers: Fine Motor Practice Stations

sponsored by: m&t bank

By: Amelia Schrader
Senior Manager of Learning and Education

Materials:

Tweezer Station
Child-safe plastic tweezers
Various colored objects (scraps of paper, pom-poms etc.)
Color sort sheet (download here)  

Tracing Station
Tracing Worksheet (download here)
Colored marker or pencil  

Dot Station
Dot practice worksheet (download here)
Bingo dabbers or similar (can also use stickers if you don’t have a dabber)  

Punching Station
Paper Strips
Stapler
Pencil or pen
Hole Puncher  

Beading/Stringing Station
String or yarn
Large wooden beads (be careful to choose a large enough of size to prevent choking)  

Length:

Set Up/Prep: 10 minutes
Activity: 25 minutes +   
Development Subject Areas: Cognition – Knowledge of the World Fine Motor Development  

Fine motor practice is incredibly important for early childhood development. These stations will help develop your child’s fine motor skills. These stations can also be beneficial for a child who is receiving Occupational Therapy (OT) services at school. Fine motor develop is crucial for your child to accomplish daily activities including writing, drawing, feeding themselves, dressing themselves etc.   

Directions:

Step 1: First you will need to compile the punch book(s) for the punching station. You can tailor these books to your child’s skill level! The most basic book is put together simply by stapling a set of paper strips together as pictured below. Remember, even turning the pages of this simple book is a fine motor skill!  You can also add challenges for this punch books as your child continues to grow and learn!
Here are some suggested adaptations:
1. Shapes: Add in shapes to each page, you child should aim to punch in the center of each of these shapes. Practice identifying each shape on the page or you can add multiple shapes to each page and have your child practice punching in the center of only certain shapes.
2. Number: Add numbers to the left hand side of the page. Your child should put that many punches into the page.
3. Sight Words: Put a sight word in the middle of the page. On the outer edge, place various letters of the alphabet – including those used in the sight word. Have your child punch out the letters of the sight word on each page.

Step 2: Next, you will need to assemble the stations. I like to keep these stations in bins and have them ready to pull out when needed. Each only takes a small amount of space.
Here are the instructions for each station:
Tweezing Station: Pour the multi colored objects you selected into a bin and place the tweezers next to the bin. If desired, print the attached color sorting worksheet and place it next to the station.
Tracing Station: Make sure this station is set up on a hard surface or has a clipboard. Print several copies of the attached tracing worksheet. Place these worksheets and a marker or pencil at this station.
Dotting Station: Print several copies of the attached dotting practice worksheet. Place bingo dabbers next to these printed worksheets. If you do not have bingo dabbers you can use sticker sheets or a stamp pad and stamper.
Punching Station: Place the selected punch book as assembled in step one at this station with a hole punch. You can use a regular hole punch or one with a shape! Just make sure you test it out first to ensure it doesn’t stick. Beading Station: Place a string and appropriate sized wooden beads at this station. Make sure the string has a large knot tied at the end so the beads cannot fall off.
Step 3: Allow your child to explore each of these stations. I recommend at least 5 minutes per station but you may need more or less depending on your childs unique skill level.
As your child refines their motor skills and continues to grow cognitively, try adding in these challenges:
Tweezing & Beading Stations: If your child has advanced past color sorting encourage them to being working on patters. They can star with copying a pattern you have created then extend to making their own pattern or guessing which color will come next in the pattern.
Tracing Station: Provide your child with more complex images to trace. Print simple images from clip art and encourage them to trace over the solid lines of the image.
Dotting Station: Incorporate number recognition practice by having your child identify a numeric symbol and dot the corresponding number of dots.
Punching Station: Try incorporating some of the challenges from Step 1, including new sight words as they are learned.  Practice these stations daily to continually improve your child’s fine motor skills!  

Vocabulary Words

Include/Inclusion: To make someone part of a group, place or activity
Exclude/Exclusion: To deny someone access to or from a group, place or activity.
Hibernation:  when an animal sleeps during the cold months when access to food and water sources are limited

Check out our other Sanity Savers posts here!

Field trips are back! Please be aware that it will be busier than usual.